Better Product Photos—Learn to Crop Products and Change Their Backgrounds
In product photography, you’ll often have to use a different background for a shoot than you’ll use for the final picture. Either the “real” picture would be complicated to take, or you don’t even know what the background will be. The solution is to crop the product, erase the background, and add a new one in its place. Just these few steps can give you your dream product photos.
The foundation for the later steps in this process is to take your picture right. Keep in mind even while you’re photographing the object that you plan to crop it, and that its current surroundings thus don’t matter. Even in cases like these it pays to follow a few rules.
3 Tips for Photographing Products
The surface on which you photograph the objects should be neutrally-colored. A gray or white background is ideal. If you shoot against a colored background, e.g. an oak table, then its color will seep into your subject. Continuing with the oak example, that would give it a yellowish tint.
Another risk is connected with photographing small products. With these, there’s the threat of an insufficient depth of field. Unless you absolutely need to have a product like this at maximum resolution, it’s better to photograph it from a larger distance. That will save you a lot of trouble with blurry outlines.
When you’re starting out, I’d recommend that you avoid trying to photograph shiny or transparent objects, because with these, the object will normally show its own surroundings. So to get these to look true to life, you need a much more complicated approach.
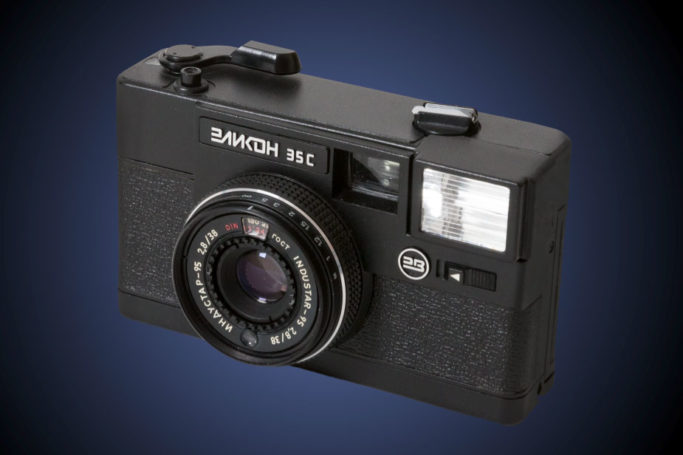
The Starting Point
Here I’ve chosen a picture of a camera against a white background as my example. There are more sophisticated ways that I could have photographed it, but this output here is typical and easy to produce even when you’re working with an improvised home desktop photo studio.

At first sight, this looks ideal as a product photo. But as we’ll soon see, even after a perfect crop, it will “act up” and betray to the viewer that it was originally surrounded by a white background. Fortunately, the fix is a quick one. And because it’s often needed for photos like these, it’s also a good one to train.
Cropping Product Photos
The foundation is to let your computer do as much for you as possible. So it’s good to take advantage of a monochromatic background and the way that it differs significantly from the object you’re photographing.
Start by using the Magic Wand tool (W) in Zoner Studio’s editor. You’ll find it on the Selection Tools toolbar. Then set its Blur value to 0, turn on the Continuous option if it’s not already turned on, and click in the empty, white part of the picture.

Depending on how high you set the Tolerance, it will select more or less of this white area. That’s because the white is not solid, but instead has a wide variety of different lightnesses.

If you’ve selected part of the object along with the background, use Back (Ctrl+Z), lower the Tolerance, and try the selection again. Sometimes it’s enough to just click somewhere else than before.
You can also add other parts of the picture to the existing selection with the Magic Wand (or any selection tool). Just hold down Shift during these extra selections. That makes a green plus appear by the cursor. This means that Zoner Studio is adding the new selection to the existing one.
If, on the other hand, you hold down Ctrl, a red minus appears, and the new selection is subtracted from the existing one.
Working like this, add as much white to the selection as you can without adding any of the product.

We could continue like this, but only with a lot of caution. Certain parts of the “white” background are dark enough that they resemble the camera’s body. So the magic wand may not distinguish them correctly.
This especially applies for the dark shadow in the middle. Therefore it’s better to resolve these problem areas via a manual selection later on. In the meantime, you have some work to do with the “automatic” selection you made using the Magic Wand. So don’t worry about any errors in these places; concentrate on the object’s other outlines.
Converting an Automatic Selection to a Mask
Turn the selection into a mask by right-clicking on the current layer (for now the only layer) and using Mask and then Hide Selection.

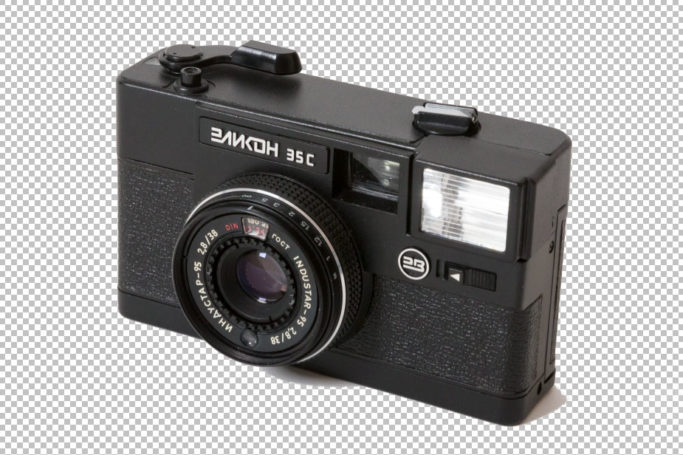
Now press Esc to cancel your selection. You’ll get a rough preview of the object with a transparent background.
Step 1: After a selection using the Magic Wand.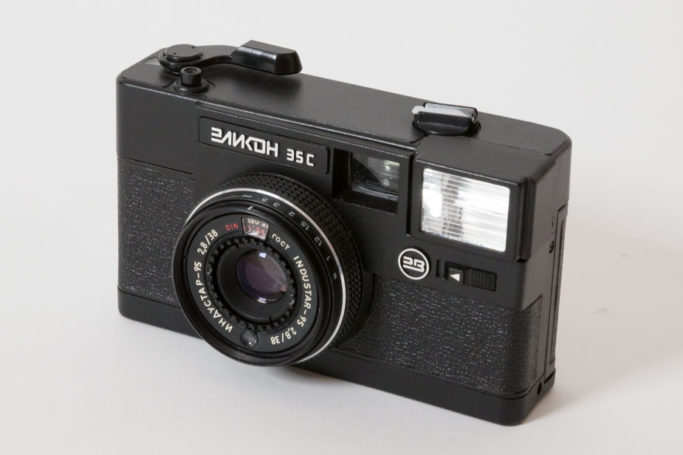
Preparing a New Product Photo Background
Now prepare your new background. That will let you fine-tune the look of your product right on top of the selected background picture or color. This preparation work is needed because every background behaves a bit differently. So cropping is when you’ll catch all the visual errors. And meanwhile you don’t have to do a perfect universal crop before this step if a much simpler one will do.
For example, if you’ll be using a lightly colored picture as your new background, that will look a lot like the original white background. So you’ll be done very fast.
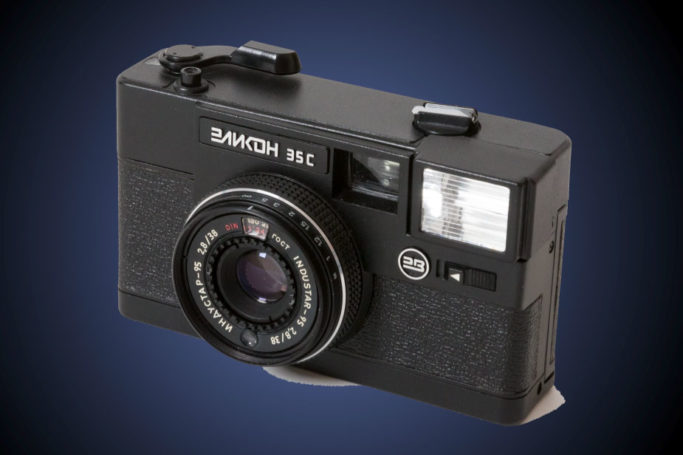
But in our example, the target background is a color gradient. So create a new layer (click Add Layer in the Layers panel and then Add Empty Layer), and then in the Layers list, drag it below the layer with your picture’s subject.


Now use the Gradient tool (Shift+B). It’s among the Drawing Tools. Choose Radial as the Type and color the background with a radial gradient. Don’t fiddle with it much; just click in the middle of the picture and stretch the gradient out into the corner. I chose a blue-black gradient:


Fine-tuning the Outline of the Automatic Selection
Here it’s very visible how a drastic change to a background—from very light to very dark—can really make a product’s light borders stand out. These aren’t completely white (otherwise the Magic Wand would have selected them), but medium gray instead, and they form a gradient between the black camera and the originally white background. But you can get rid of them quickly.
First press Ctrl and click on the layer mask. Once again you’ll see the selection made from this layer’s mask. Then in the Selection menu, use Modify Selection, and then in the Modify Selection window, move Stretch/shrink into the negative values. This setting sets by how many pixels to move the border out or in. A typical value used for pictures like this one is -2 to -3.


The change that happens when you click OK now will be small, and maybe even invisible. But here again, just turn the selection into a layer mask (right-click the layer’s name, then use Mask, then Reveal Selection) and cancel the selection. You’ll then see that the thin whitish outlines have disappeared.

Step 3: Partially getting rid of the white borders. Next it’s time to edit away the shadow cast by the camera. There are several ways to go here. For example you can select the part of the picture you don’t want using a selection tool (e.g. the Magnetic Lasso), and then switch into the mask and fill the selected area with black. Personally I prefer precise work with a tablet for product photos (and other things too). If you’d like to work this way too, then switch to drawing on the mask by clicking the small mask icon in the Layers group. Then activate the Brush tool in the Drawing Tools. Now select black as the drawing color if it’s not already selected, and paint over the places that the Magic Wand handled poorly. You should end up with something like this: There’s one more thing left to do. In the original photo, the white background is reflected inside the subject, and this is distracting against the new dark background. So you’ll want to darken the affected edges. This work is similar to the preceding step, except that here you switch back from drawing on the mask to drawing on the image itself (in the Layers panel, click on the icon for the given layer itself). The Darken tool in the Retouching Tools group is what you’ll be using here. Give it a large radius. Then just draw along the contours themselves, with only a light touch of the brush, and darken the area with gradual strokes. By this point the “faked” photo will be very convincing: If you have time for some more editing or you need a perfect result, then there’s still the whole right side of the camera which you can fine-tune, as it’s unnaturally light. It’s not an outright error, but if needed you can remove the lightness similarly to how you removed the shadow. Just in a larger extent:
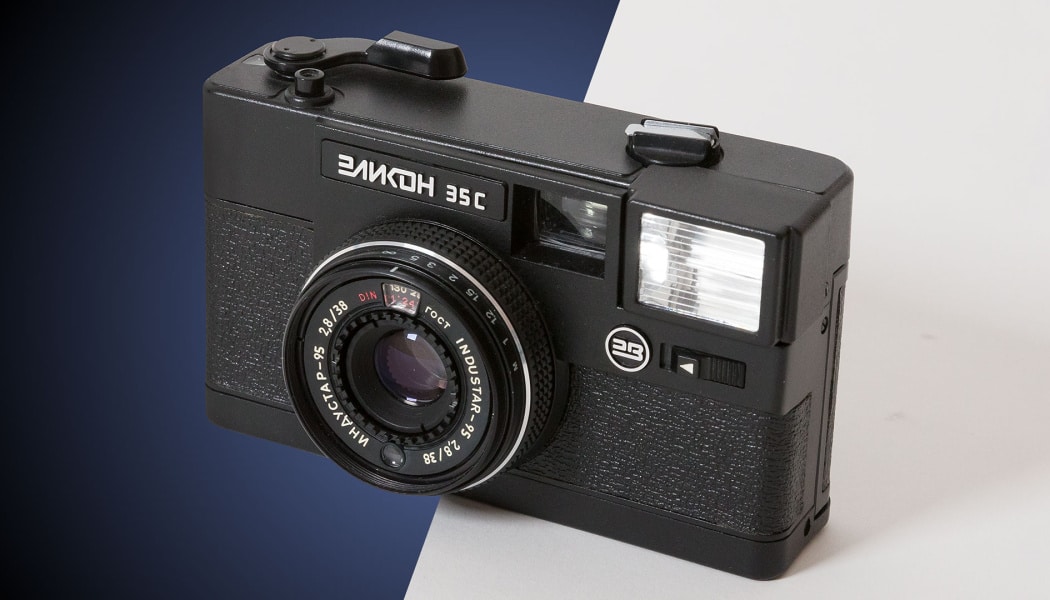
Step 6: Once the overly bright side is darkened, the product’s transition into its new background is truly complete. I deliberately chose a fairly average picture as my example. It was neither complicated nor primitive, so it was good for illustrating the various basic techniques. In practice the difficulty of cropping product photos varies widely. Experience will help, as well as some thinking before the shot itself. If you can make your product photo a good fit for your new background, then you’re halfway there, and you’ll save yourself a lot of work. More articles on product photography: Discover the best way to crop products and put them against a new background. Download Zoner Studio, try it 7 days for free, open your photos, and try out product-photo editing for real.Manually Cropping Complicated Areas


Fine-tuning Lightness in the Edges


Product Photo Editing: Sometimes Easy, Sometimes Hard

There are no comments yet.