Making Autofocus Work for You
Cameras today have some very advanced autofocus systems. But it does take a little knowledge and skill to get the most out of them. Read on for important tips on making autofocus benefit you and your photography.
In compacts that use contrast detection the situation is relatively simple. You just use the focus rectangle to mark the spot that interests you, and the autofocus system takes care of the rest. As long as the electronics have somewhere to focus—as you’re not aiming at e.g. a white wall, then everything generally works out, though you might have to wait a bit.
Meanwhile your options are much broader when you are using a more advanced camera such as a DSLR, mirrorless camera, or anything else that uses phase detection—the autofocus system that enables fast, precise focusing.
Focus Points
Even though the viewfinder shows each focus point as a small square, we know from the last article in this series that it’s physically a horizontal or vertical detection strip, or set of strips (a cross point). That leads to several things about focus points that you should remember:
Bigger Than You Think
The detection strips usually extend beyond the boundaries of the viewfinder’s square. So you can end up inadvertently focusing on an object that’s outside the focus point. Because of this, you need to keep far away from borderline situations, or double-check the focus before (or just after) pressing the trigger.

Off-center Sensors
Due to manufacturing tolerances, it can sometimes happen that the detection strip (or cross) does not lead precisely through the center of the square. The square just outlines the borders of the area that the strip is within. So it may be shifted to one side, which is something you should watch out for, because it may focus on an unexpected object that you thought was sufficiently far away.

Varying Sensitivity
As mentioned earlier in this series, cameras usually contain points with different levels of focusing ability. The most problem-free points are in the middle; they’re generally cross or two-cross points. The one towards the edges tend to be sensitive to just one dimension or the other.
Some points can only gain high sensitivity with the help of a fast lens, or can lose it with a slow lens (or a teleconverter). Physically, this typically means a second cross joining the first, or with a cheap lens, certain edge points becoming completely unavailable.

Each strip can focus on image structures (edges) that are perpendicular to the strip, and so for example a focus point based on a vertical strip is not going to help you focus on a typical fence. But a horizontal strip will have no problem with it.

Imprecisions
Unfortunately, some lenses’ manufacturing tolerances also mean that your camera might think it’s focused perfectly while actually being focused a little closer or farther away than it should… each time, all the time. In some camera bodies, you can resolve minor errors from the menu (Autofocus microadjustment), but for large ones, you’ll need to take the lens to the shop.

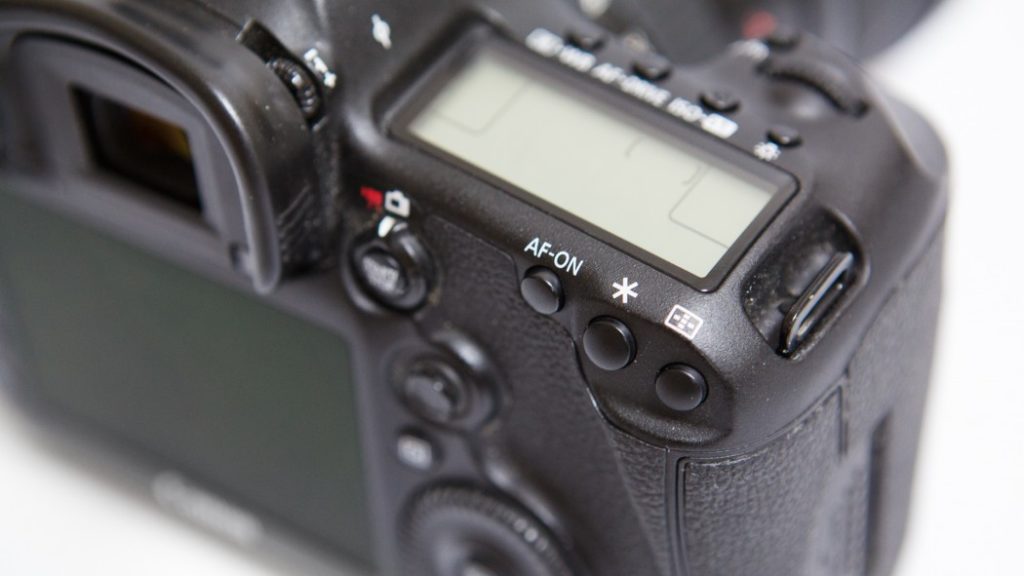
The Focus Button
A camera trigger normally covers two functions—focusing and shutter control. But in many situations it’s useful to have them separated, and so advanced photographers usually have these two functions divided over two buttons. Generally they focus using a special button with a name like AF-ON, located by the right thumb. They use a menu item to make the trigger stop handling focus, and that job is given to the AF-ON button.

Personally I’ve become used to the opposite system, where the trigger normally handles both functions, but holding down AF-ON turns off autofocus. But I think both approaches are fine. It’s up to each photographer to decide which approach suits them better.
Focusing Modes
There are three basic focusing modes. Your camera will have some quick way to switch among them. They set the foundation of how it focuses.
Once Is Enough
That’s what I call this one. Canon calls it One Shot AF. Nikon calls it AF-S. It’s made for static scenes. It spends a little more time to get the focus as precise as possible. Then the focus point (or points) that’s in focus blinks in the viewfinder. There may be a beep. At this point focusing is complete—you can now change the composition and finish pressing down the trigger.
Continuous
For action-heavy situations there’s a mode that focuses nonstop once you activate it, so it can follow an object in motion. In Canons this is called AI Servo AF; in Nikons, it’s called AF-C. I recommend keeping this mode as controllable as possible, using the menu item and the AF-ON button I mentioned above.
This mode makes sacrifices for speed, and so in low light, it may not actually achieve sharpness quickly at all. But the focus is constantly fine-tuned, and even if you move the camera, this mode doesn’t have major trouble tracking your subject. All the focus points are “watching” the subject as it travels through the scene and “passing” it to each other.
One small disadvantage of this mode is that, unlike in the previous mode, the lighting LED on your flash won’t turn on when you’re working in the dark.
Combining Both Approaches
The third mode (Canon’s AI Focus AF; Nikon’s AF-A) starts with precise focus as if you were working with a static scene, but if it later senses that the camera or the subject has moved, it switches to tracking, continuous mode and stays there. So outside of action-packed sports photography, this mode can be a good compromise between the above two.
Choosing the Initial Focus Point
Cameras normally let you choose a specific focus point or leave all of the points active (or even just a group). If you don’t, the electronics choose the point that encountered the nearest object.
But this process is usually slow, and there’s a risk that in the end it will choose a completely different object than what you had in mind. So for precision work, it’s better to choose a specific point.
If you have a low focus-point count, don’t despair. Personally even on my Canon 5D Mark III, which has 61 points and very advanced focus modes, I use just the center point almost all the time even when shooting weddings and other events. But it depends on the speed of the action in the scenes you’re shooting.
Manual Focus
CAUTION. Are you surprised to see that word outside an instruction book? Then consider this: manually focusing in automatic mode can do expensive damage to your lens. If it does not have the Full Time Manual ability (mostly only found in the most expensive lenses—see the article on autofocus drives), then you must physically switch from automatic focus to manual. That disengages the motor, letting you manually focus safely. Otherwise, you risk damaging the motor or the gears.

Camera electronics can help you out even when you’re focusing manually. In some cases, a blink will indicate that you’ve focused under a certain focus point. Systems with electronic viewfinders may show “zebra stripes” in high-contrast spots or show a close-up of part of the picture.
Study Your Bible
To get the most out of autofocus, I recommend that you go through your camera’s menu and its manual, even if you’re sure that you already know it by heart. You’ll almost always find sections or notes that are new to you and will help you understand what’s going on behind the scenes. Here’s wishing you lots of sharp photos!
There are no comments yet.