What’s the Cure for Receding Lines?
Not hairlines—building lines! Many people find it distracting when buildings in pictures are “falling backwards.” If you’re not a fan either, read on to find the solution.
Receding lines are a problem every time you take a picture with your camera’s lens tilted up above the horizon. Because of the perspective effect, this makes the lines in buildings run together at the top, and creates the optical impression that the building is falling backwards. It can feel wrong, and even unpleasant. The following photo is a good example of this effect:

Canon 40D, Canon EF-S 10-22/3.5-4.5, 1/5 s, F8.0, ISO 100, focus 10 mm
Although not everyone minds this perspective distortion, some photographers are very sensitive about it, and correct it in all of their pictures. No matter which of these two camps you’re in, or even if you’ve thought about this, it’s worth knowing how to keep buildings standing straight.
Shoot It Right
This is easier said than done. The only way to take architectural photos using normal equipment while avoiding slanted walls is to keep the lens pointed neither up nor down, but straight ahead.
Sometimes this works, as in the following picture:

Canon 40D, Canon EF-S 10-22/3.5-4.5, 1/100 s, F8.0, ISO 100, focus 10 mm
Unfortunately, when there’s no interesting foreground available, this leaves the bottom half of the picture uninteresting, and so you will need to crop the picture, removing quite a bit of it. This needs to be kept in mind when for example preparing the photo for print.
Also, this lens angle can prevent buildings from fitting into the frame, often making it an impractical solution.
The Perfect Kit
If you want zero compromises, there’s only one option left: a tilt/shift lens. These lenses are best-known for their ability to shift the focal plane to achieve an atypical focus. (We have discussed this in previous articles on simulating this effect and on homemade variants on the tilt/shift lens).
Nevertheless, this is just half of their magic. The other half concerns shooting architecture with the camera held horizontally. A tilt-shift lens can be shifted a couple of millimeters upwards (actually shifted, not rotated). This gives you a picture with perfectly straight lines and yet with no ground in it—its bottom will lie on the horizon.
Unfortunately, specialized tilt/shift lenses are very expensive. This is because of their moving parts and because, in order to make it possible for you to configure them like this, their glasses are significantly larger than for normal lenses, and cover a much larger area than the sensor.
But one consequence of these facts is that you can create your own tilt/shift by using a special adapter together with a lens made for a larger sensor than your camera’s. For example, a Micro Four Thirds camera can use a much-larger full frame Canon EF lens with the help of this accessory. Working this way you can transform any regular lens into a tilt/shift.
But that puts us in rather specialized waters, so here let’s look instead at what’s by far the most common solution for receding lines.
Fixing It Digitally
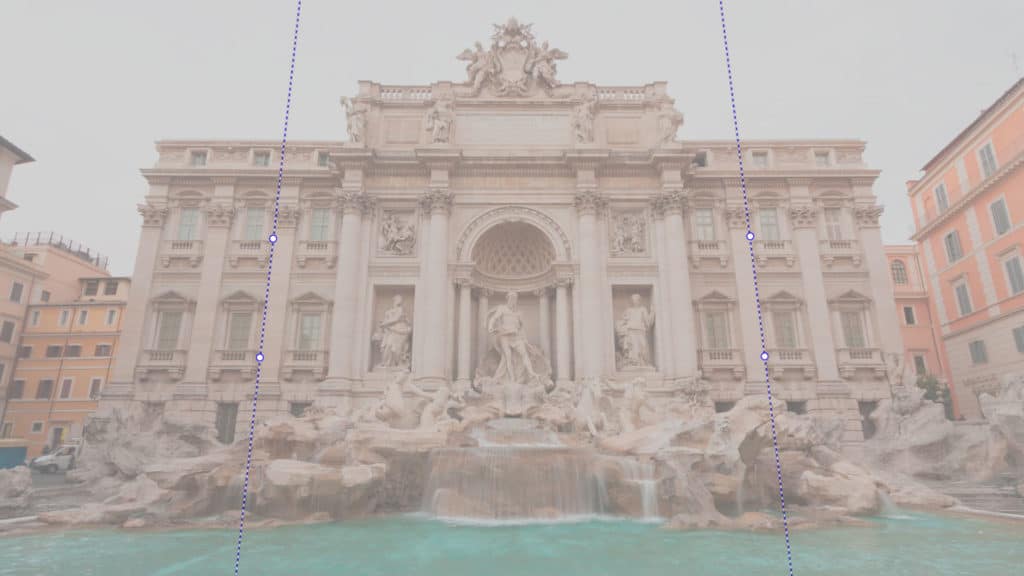
If you don’t own a tilt/shift lens, and you haven’t held the camera level with the horizon, then there is still PC software as a solution. In Zoner Studio, it’s especially easy to edit receding lines. To do this, use the Collinearity tool—start by clicking its button in the Editor’s Toolbox or pressing K. Drag and rotate the two lines here to tell the program the current directions of the picture’s receding lines:

After you click Apply, the program straightens these lines and, with them, the whole picture. Some authors consider auto-cropping to be a universal “must.” I personally recommend turning it off here, so you get results like this:
Although auto-cropping greatly speeds up your work, it robs you of some freedom and control over the crop ratio. Here for example to keep the 3:2 ratio while making sure that the picture contains both the fountain’s upper edge and the pigeon at the bottom, I chose a crop that automatic cropping wouldn’t allow, since it contains empty, white areas:

Yes, there are white areas, but these are easy to fix. The missing areas are in the water and have a simple texture, so I can fix them in about two minutes using the Clone Stamp:

No Free Lunch
However, through this correction, I lost a lot of the picture, since it now lies outside the borders of the crop and can never be used in the straightened picture. Also, the pixels in the upper part of the picture were “stretched out,” and so the upper part has lost some of its original sharpness. Even still, for normal work these are not showstopper problems, and so these fixes can be made without major fuss. (A tilt/shift lens would have provided us this final picture with maximum sharpness and without the need for editing.)
Is It Necessary?
Personally I consider receding lines to be a minor matter in most cases, and I deliberately only edit weakly receding lines. I take strongly receding lines as a natural perspective effect, and so I don’t correct it.
In the sample illustration, this edit made sense, and I think that the result looks better than the initial state. But there are many cases where it is hard to make any changes.
Take the following picture for example:

Canon 5D Mark II, Canon EF 16-35/2.8 II, 1/125 s, F2.8, ISO 100, focus 16 mm
Even though you can correct a picture like this, the result will lose its drama, not to mention the fact that the transformation will be major and so the loss of quality will be noticeable.

There are also pictures where it’s practically impossible to do correction well because it would rob us of important elements:

And so in the end, perspective correction is up to individual choice. The important thing is to treat each photo, too, as individual. If you don’t like a certain picture’s perspective, you now know how to straighten it, and edits like these will be no problem for you.
There are no comments yet.