Editing Product Photos: How to Deal With Cropping, Retouching, and Light
The article is over 5 years old. The information in it may be outdated.
![]()
We are working on its update. In the meantime, you can read some more recent articles.
The goal of product photography is to set up a scene, lights, and the object you’re photographing to minimize the number of adjustments needed. Despite this, situations can arise when you’re photographing e.g. an art composition or an individual product and you want to make your final picture look even better. Zoner Studio can handle edits like these easily. We’ll teach you the most common and important ones.
Carefully setting up the scene, the lights, and the object you’re photographing is especially important for large series of objects where every added edit is multiplied many times. In these kinds of cases, it pays to invest time into very thorough preparations before your shoot. For some help with this, see our previous articles on product photography:
This time around we’ll be looking at a few edits and tips that will always come in handy when you’re adjusting product photos.
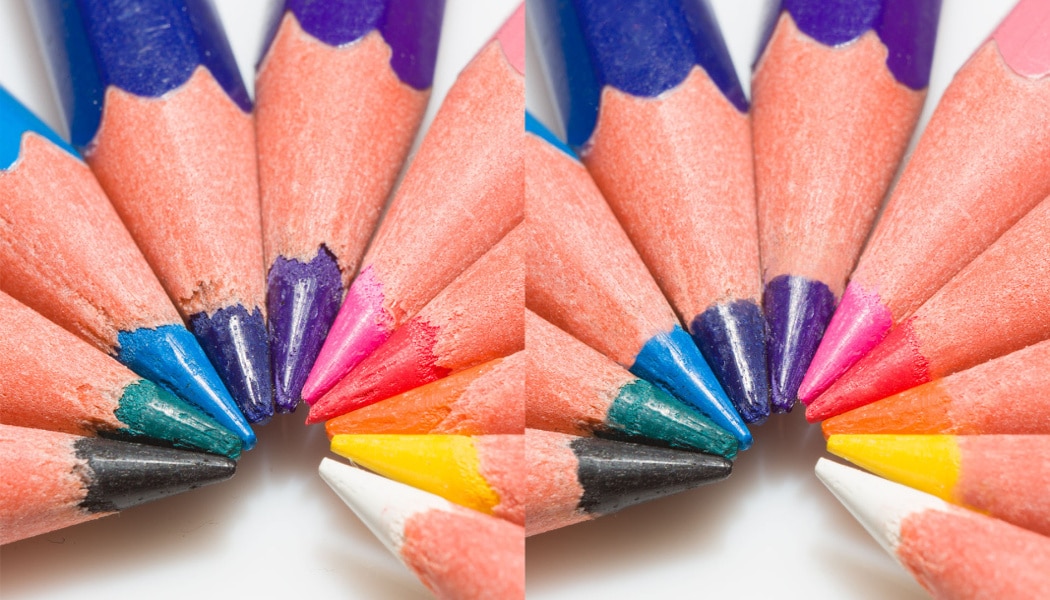
How Crop
I like photographing products a bit of edge space around them; I can always get rid of it later in Zoner Studio. The place for this is the Develop module, using the Crop and Rotate (C) tool. This edge space gives me a reserve in case e.g. my camera turned on my tripod (or in my hands) and I need to correct the picture. A large edge space is also beneficial if the product isn’t completely in the middle—it’s enough to crop, and there’s no need to paint in more background on the opposite side.

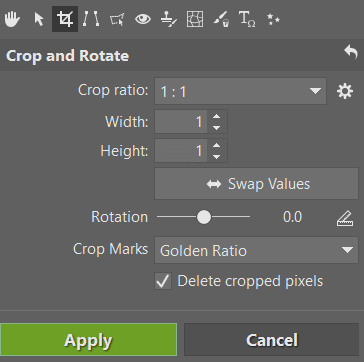
Very often you’ll need to have your result in a square format. When you’re using the cropping tool, you can make this change too. There’s no need to guess the ratio of sides by eye; just set the Crop ratio to 1:1, and your result will automatically be a perfect square.
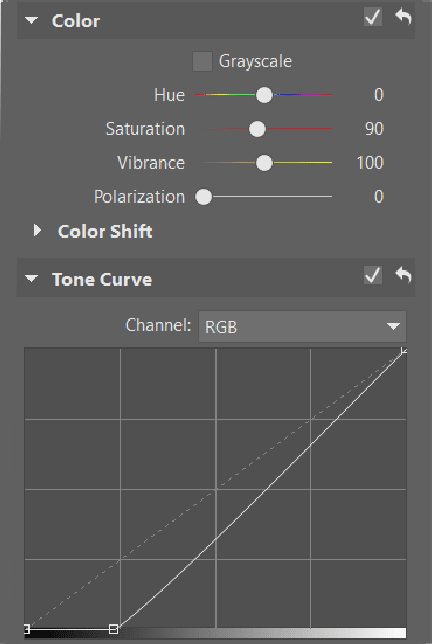
White Balance
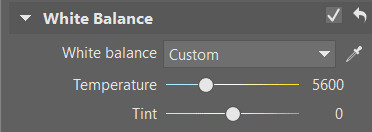
Watch out for automatic white balance on your camera! If you had this function turned on during the shoot, your pictures will like each have a slightly different white balance. All the same, when you’re shooting to RAW, you have the opportunity to fix this with no loss of quality. Do this in the Develop module. Either enter a numerical value into the White Balance box or choose a white balance value using the eyedropper. The color temperature has to be the same for all the photos.
Excessively Strong or Weak Light
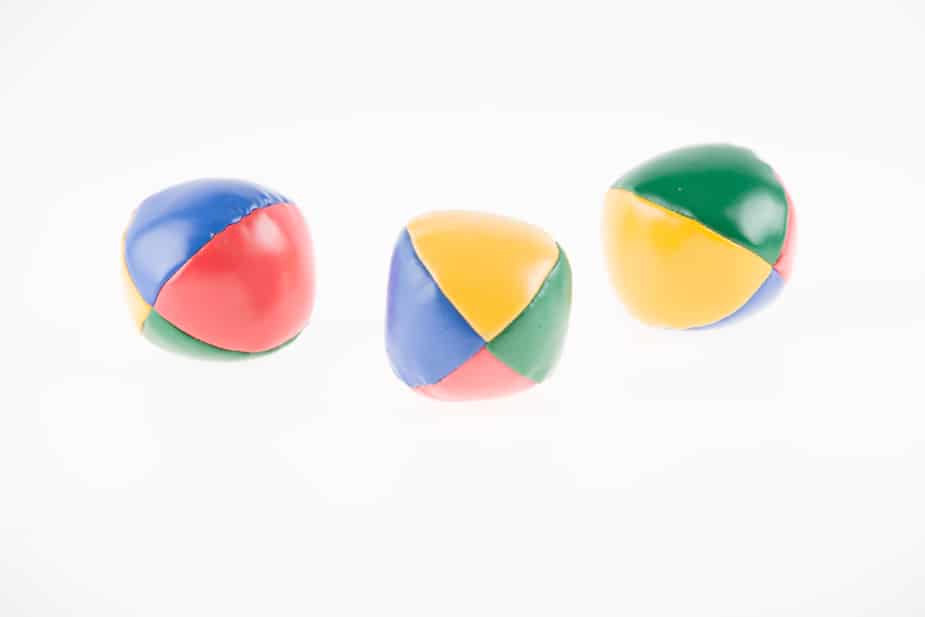
Sometimes you end up putting too much light on an object, like in the picture below:
This doesn’t always have to just be a problem with the light; it can also be with the lens or the sensor, which simply couldn’t handle the quantity of light (a better lens might have handled it). In any case, in this situation you have a quick solution at hand in the Develop module. It’s not a good idea to use the Exposure or Lights sliders for this, because these would darken both the object and its background towards gray, which we don’t want. What’s much better is to shift the Black Point into the negatives or to use the Tone Curve. Both of these routes will usually increase saturation too, which you’ll then need to bring back down using the appropriate slider.
Here not even the minimum value for the Black Point was enough, and so a Curves-based approach was used, with these settings:
And here’s the result:

The opposite situation occurs when the background hasn’t received enough light and is still just a very light gray instead of white:

If you want a pure white background (for example to make the picture a better fit for a web page), the White point slider or the other side of the Tone Curve will be your main helpers. Here a curve with three nodes has been used. This curve is brightening the background and the light part of the photo, while not touching its darker colors.
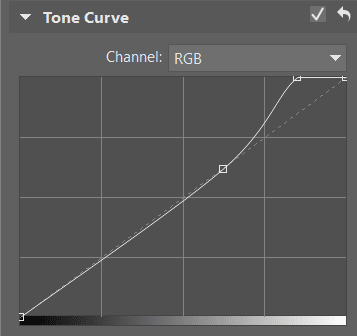
And the resulting photo:
Blurring the Background
A paper background that isn’t supposed to be completely white may have spots due to ripples in the surface below it, or the structure of the paper itself may be distracting. In both of these cases, the only solution is to blur the background.
Cloning and Retouching
To remove specks of dust and similar imperfections, use the retouching tools. Here it depends purely on your patience and on what all bothers you in the picture. In just a few seconds you can repair a few dusty spots, but you can also work on adjustments for a much longer time and repair extensive defects like in the photos below:
A photo before and after retouching.
When small dust specks, spots on the sensor, or other small defects are involved, I recommend staying in the Develop module and using the Retouching Brush (J).

For complicated edits you’ll have to switch over into the Editor, which has a whole tool group devoted to Retouching Tools. Using these together with layers you can do almost anything, and time will be your only limitation.

From Here As You Wish
You’ll usually have to use standard edits like brightness and contrast as well. These workflows are highly individual, and they also depend on the product and the photo’s style. In any case, using the Exposure group in Develop or via Quick Edits (Q) in the Editor you’ll finish them in no time.
When simple edits aren’t enough, though, you can reach for a more advanced transformation: cropping tightly around the object’s edges and then replacing the background behind it. This workflow will give you results you could never achieve with just a camera.
In any case, I hope that you do manage to get all the basics into your pictures via your camera itself, so you’ll need as little work afterwards as possible!
TerryB
Vit, RAW module? Anyone with ZPS 18 will look for this in vain.:D) It has been replaced by the Develop module.
I find the healing brush and clone stamp very useful, especially when working on scanned 35mm negs, where the damage caused by scratches and dust can easily show up. But a useful tip about using them as, whilst on the surface they do the same thing, they have distinct differences and one can be preferable to the other, or one should switch from the healing brush to the clone stamp for greater local control.
For example, the healing brush pulls in pixels from the surrounding area and blends them to form a uniform “whole” and which can’t be seen. However if one approaches too closely to a surrounding part of the image, the healing stamp will pull in info from that area. For example, with my scanned negs, it is often necessary to do a lot of healing in the sky area but where the sky borders on, say, a roof top, if I approach too closely the heal blend will include a shadow from the roof. So approaching such distinct boundaries it is better to switch over to the clone stamp for more control and greater accuracy.
Vit Kovalcik
Hi Terry, you caught me – obviously I am not vigilant enough to keep up with the frequency of updates of the Zoner Photo Studio :) I have changed the RAW module to Develop in the text (might take some time to refresh due to the caching).
As for the rest of your text, you are absolutely correct. These are nice tips for using the healing brush and the clone stamp. I thought everybody will learn when to use one tool or another depending on situations by “simply” using it and observing the results, but I guess it might be confusing at start. So thanks for summed up pointers!