Five edits that every photo montage needs. Learn how to properly add objects to your photos
The article is over 5 years old. The information in it may be outdated.
![]()
We are working on its update. In the meantime, you can read some more recent articles.
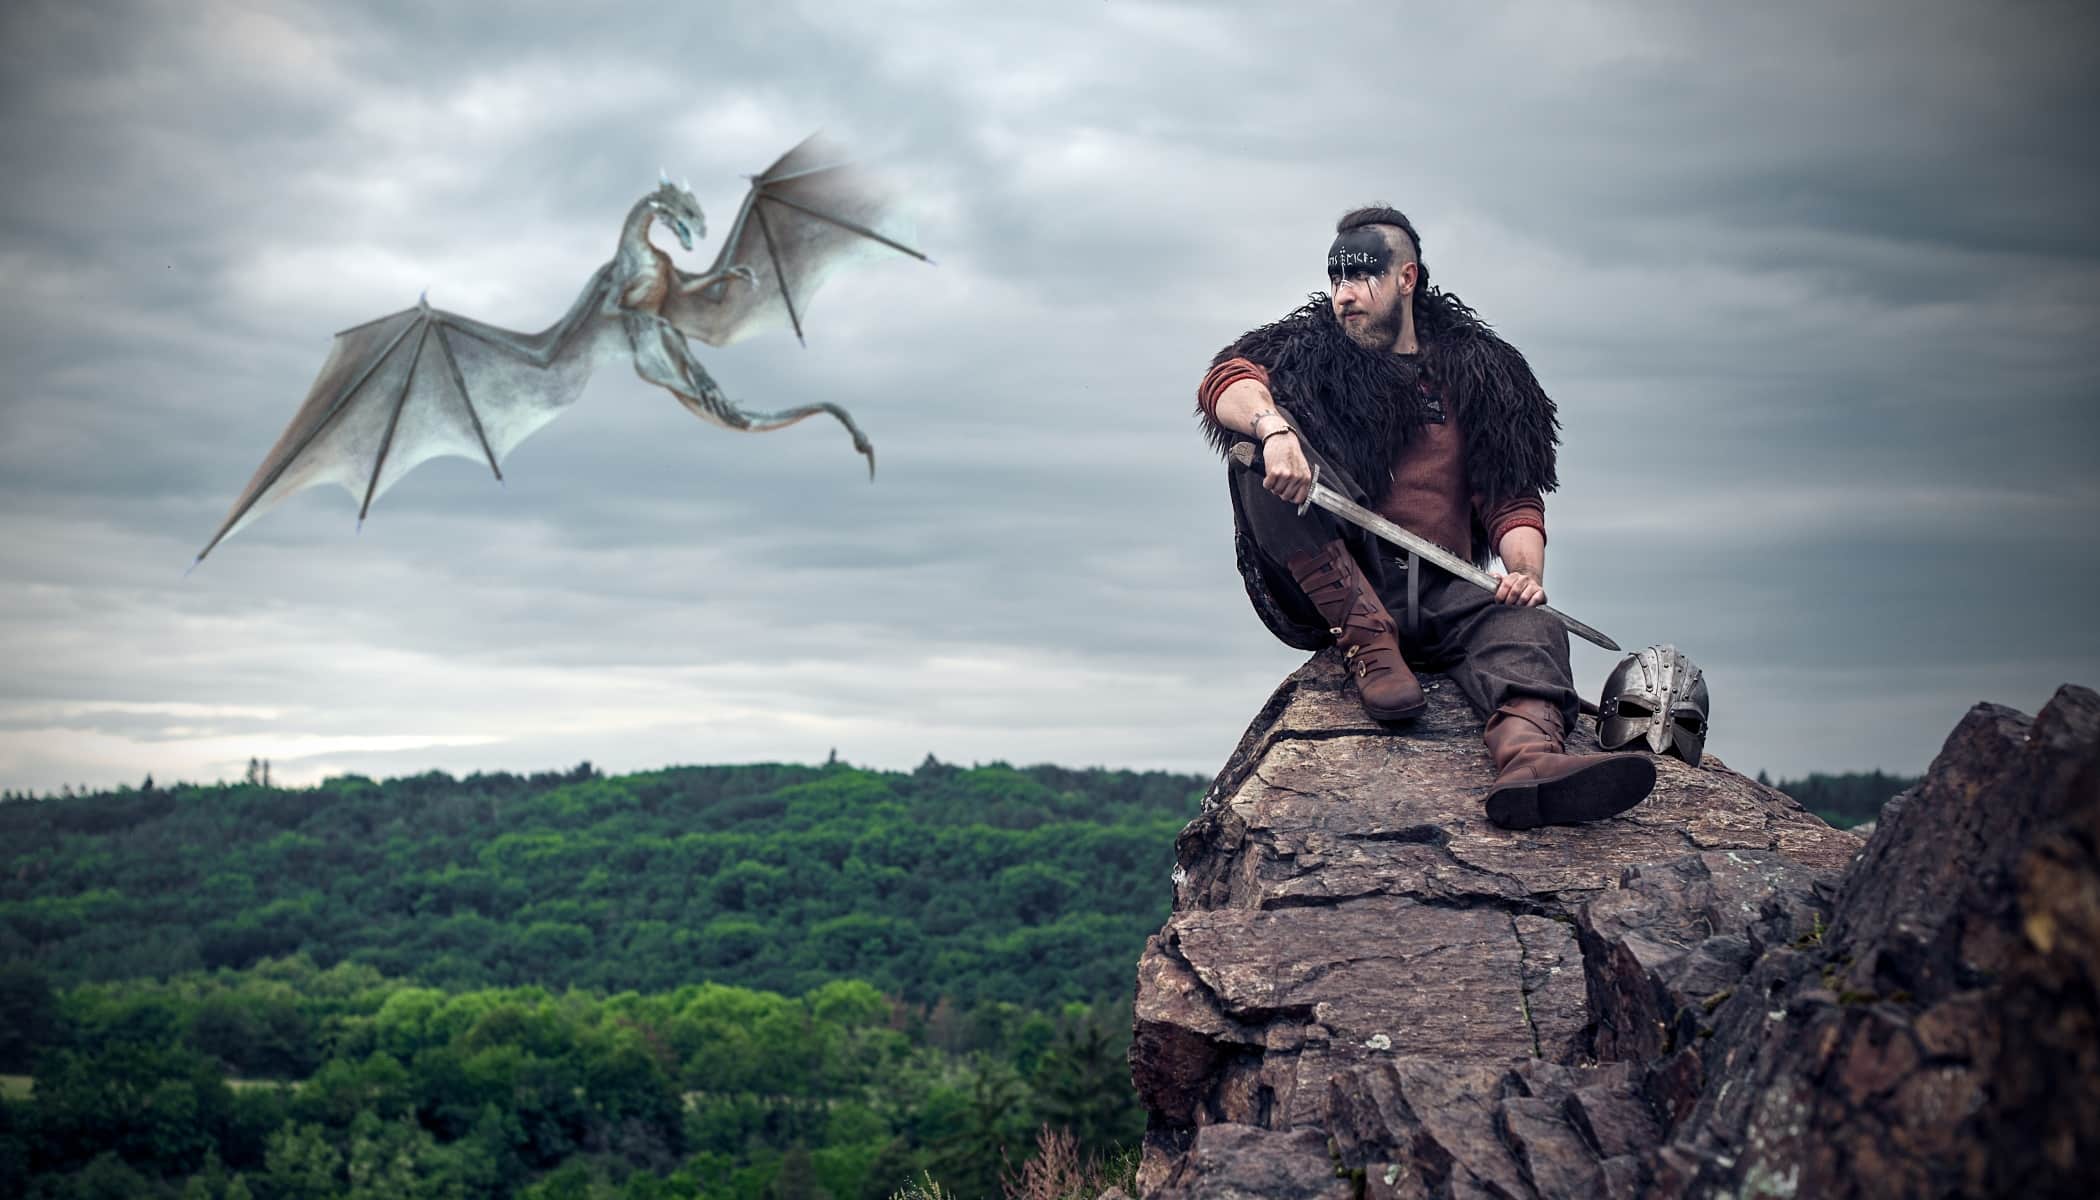
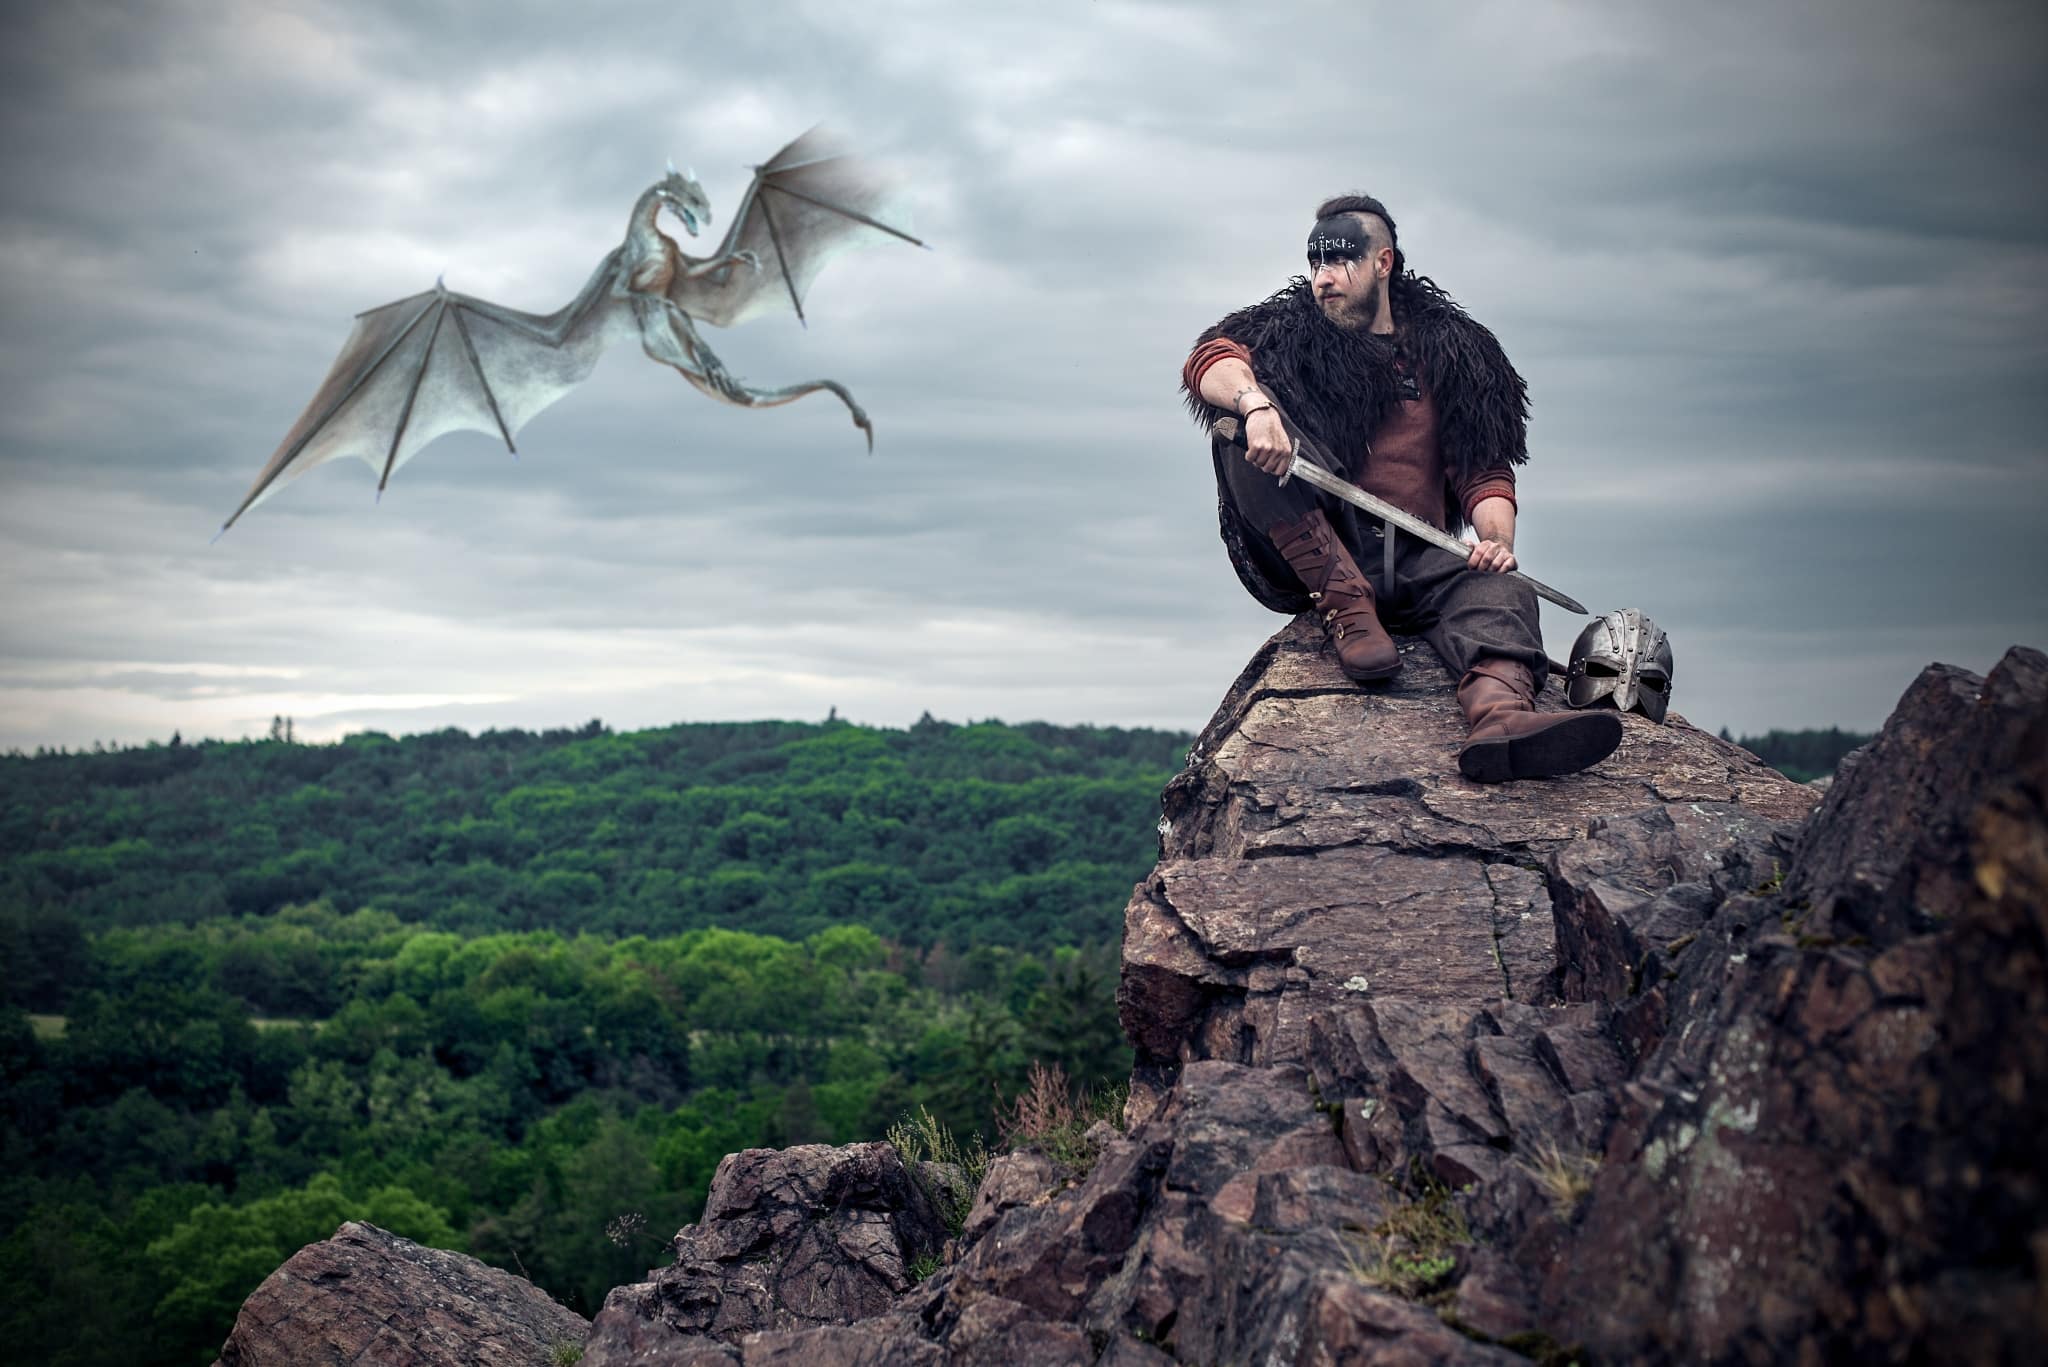
Adding various objects to a photo isn’t all that complicated, but you do need to adhere to a few guidelines. We’ll walk you through five basic steps that are key to a good photo montage. Master them and your photo montage will look significantly more realistic. In this article, we demonstrate how to add a dragon to the sky, but feel free to start with something more basic.
For your photo montage to look realistic, it’s important to edit the inserted object so that it blends in with the photo. Follow these five basic steps:
- Blur,
- Add noise,
- Adjust color,
- Adjust exposure, and
- Place the object into the photograph.
These steps will help you blend the object with the rest of the photograph. If you are planning a more complicated photo montage, you’ll need to do more editing. But to start out, these are sufficient. We’ll show you how to do them in Zoner Studio. We’ll be working in the Editor Module.
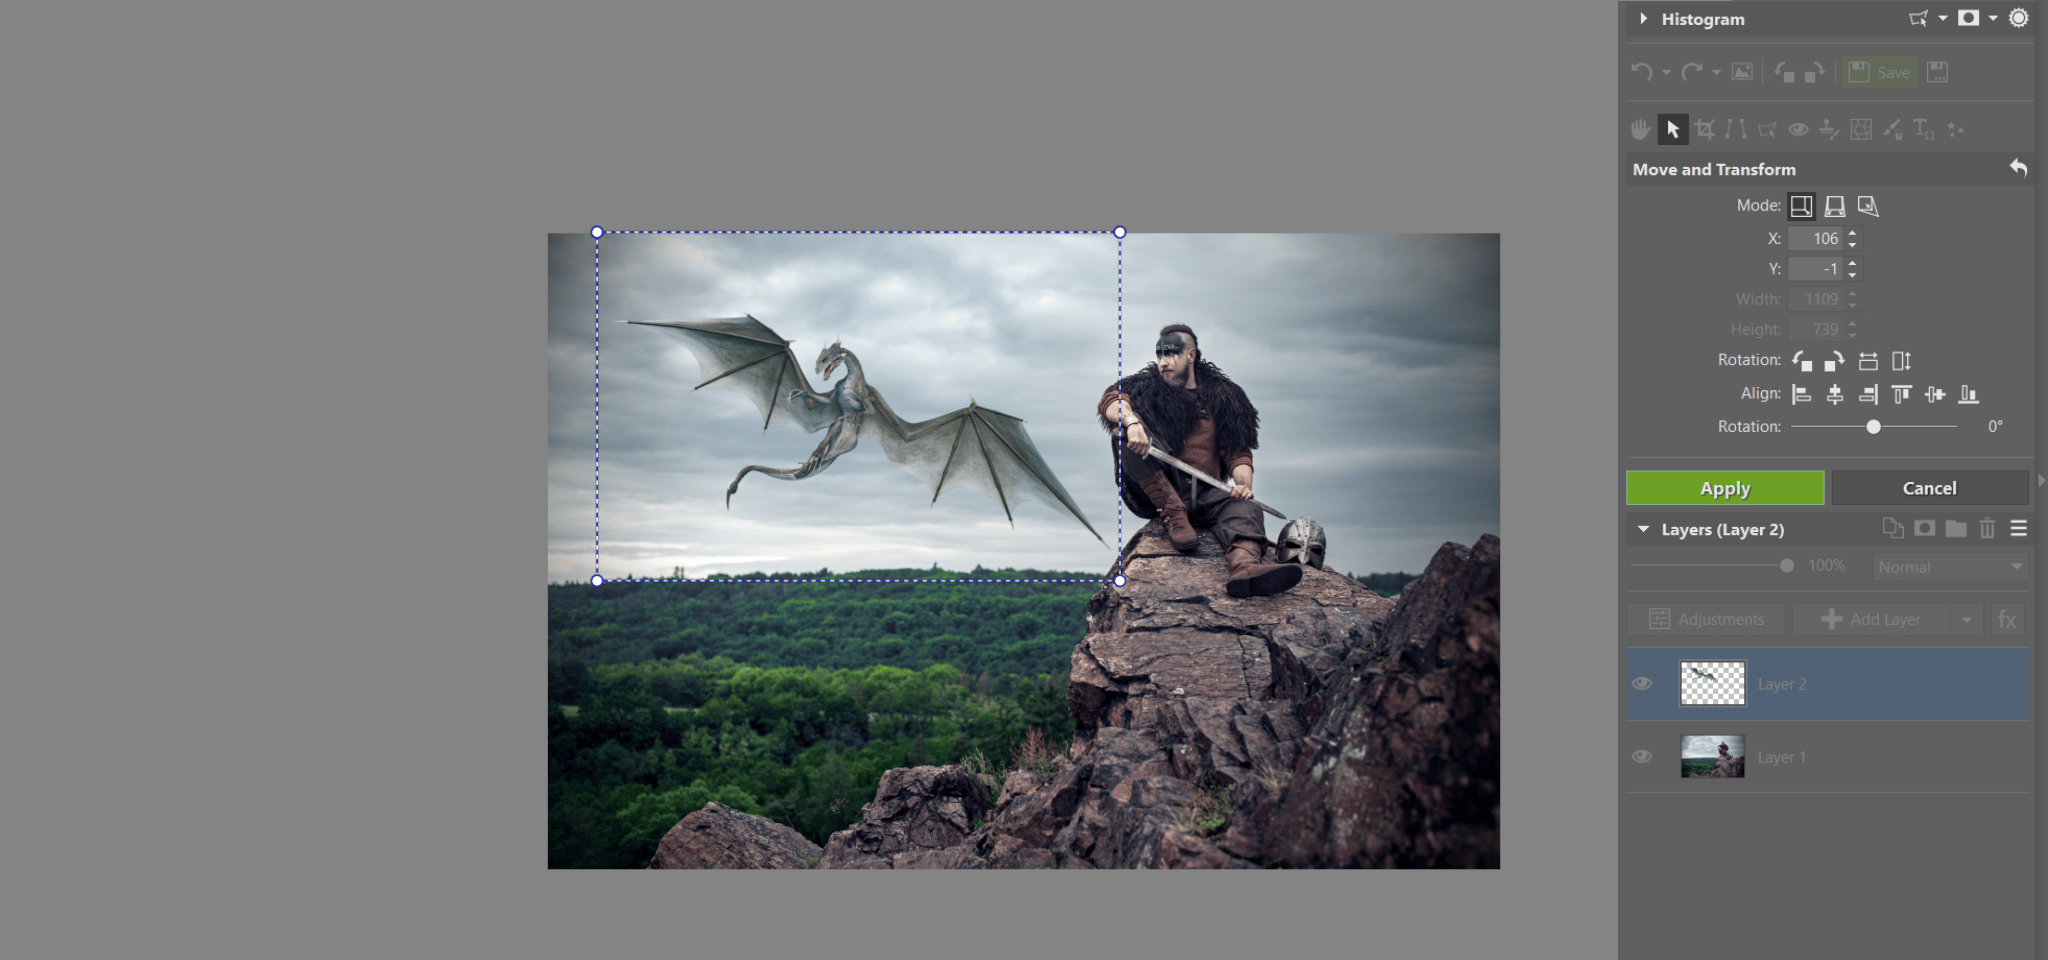
Place the object into the original photograph
First, place the object into the photograph. In our example, we’re going to magically make a dragon appear. Click the arrow next to the Add Layer button and choose the option Paste from File. It’s best to upload the image in PNG format which comes slightly prepared in that it has no background color.
You can create a PNG format image with no background yourself in Zoner Studio. We explain the steps in the article How to create a transparent background.
Use the Move and Transform (V) tool to move, reduce, skew, and place the object in the photo so that it looks natural.
Blur the object
When you are happy with its placement, you can move to the first step – Blur.
It will certainly make your job easier if you place the object outside the depth of field. If you want it right next to the focal point of the photograph, then you probably won’t be able to get it to look natural. Adding objects to a photograph is quite a major disruption and even the slightest error is immediately noticeable. If you’re not a true pro, it’s a good idea to use a few tricks to conceal the details in the photograph. The devil is in the details.

By blurring the image, you place the object optically in front of or behind the main subject of the photo. You’ll be able to hide the fact that any type of manipulation was used. Of course, no one will believe there was actually a dragon in the photo, but at least it will appear realistic, as if it were actually there.
Choose the Blur tool (Ctrl+6). Make sure you are working in the right layer and blur the added object the desired amount. It’s a good idea to zoom in on the object and observe how it blends in with its surroundings in detail.
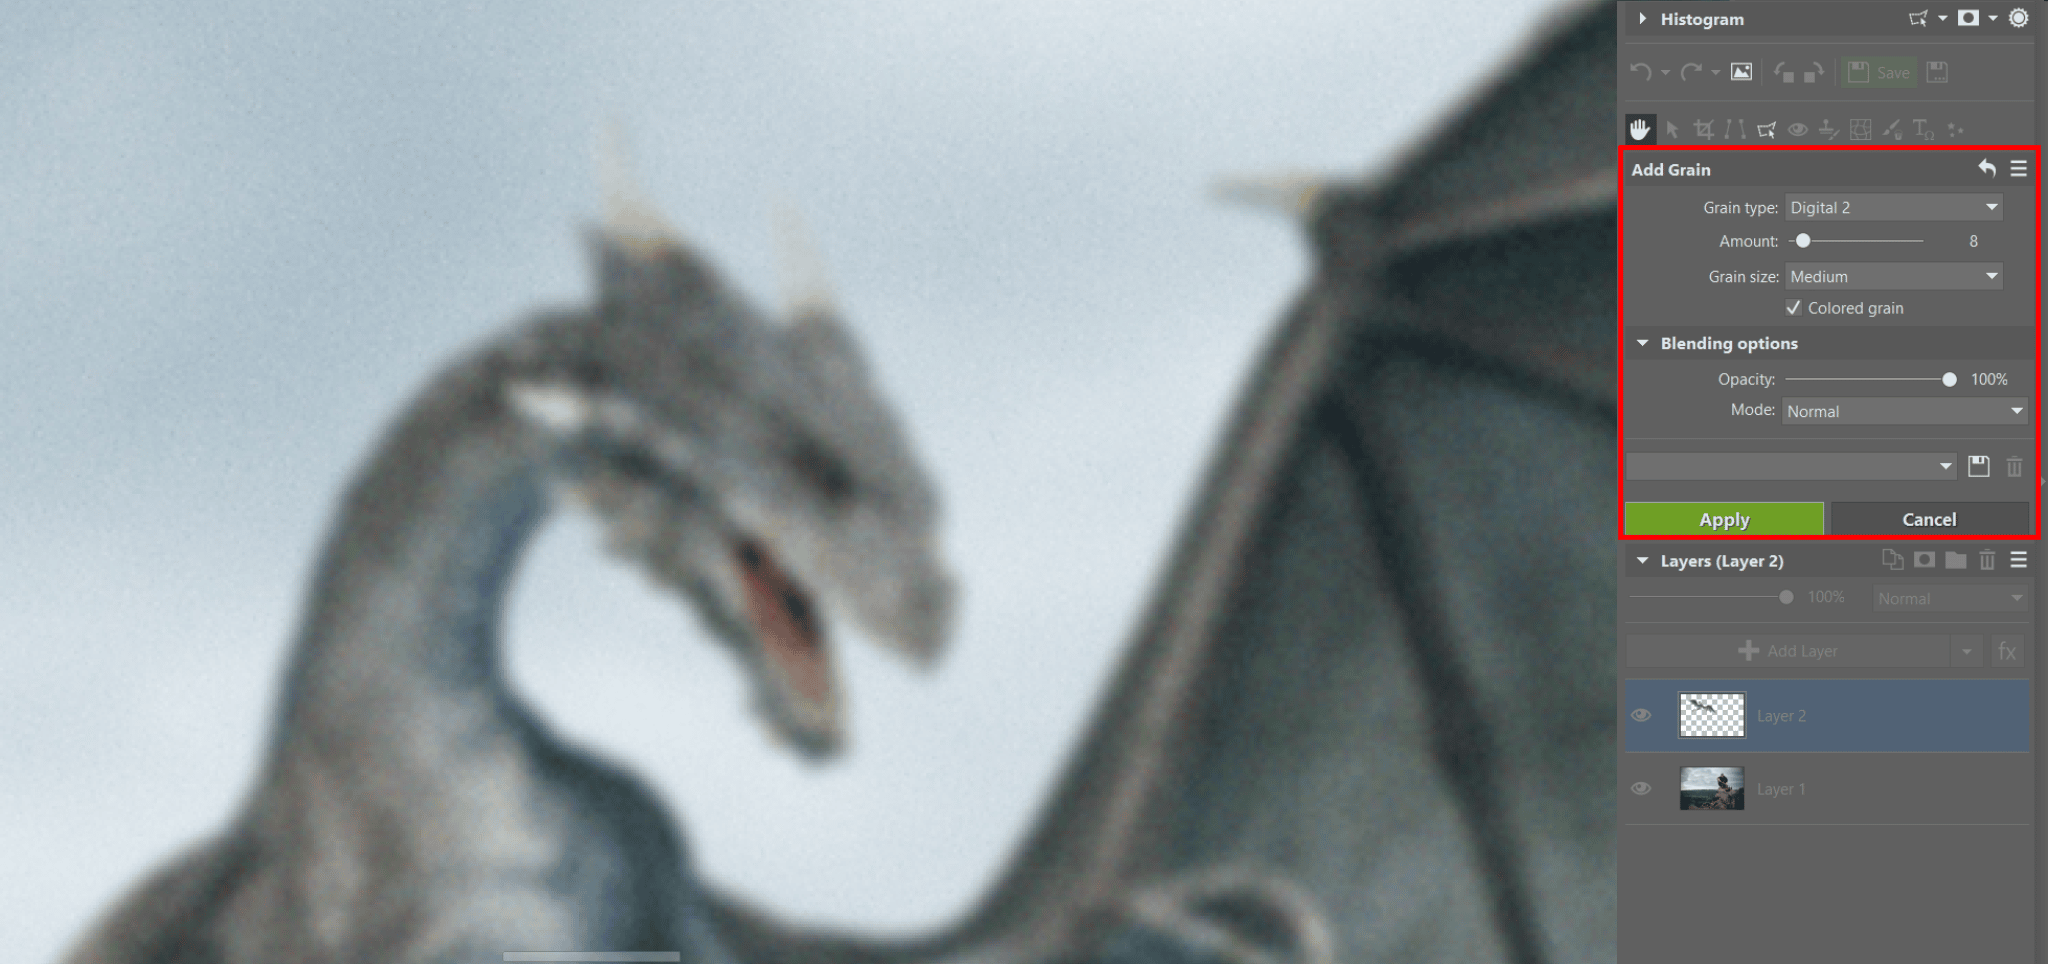
Add noise
The next step is to Add Grain. This effect is necessary since the inserted image most likely doesn’t have the same level of noise as your original photograph. For this reason, you must match the inserted image with the rest of the photograph.
Add Grain is a function which can be found in the upper panel in the Effects menu. We recommend you choose a Digital grain type, but you’ll see for yourself what type of noise will help blend the added object with the original photo best.
Adjust color and exposure
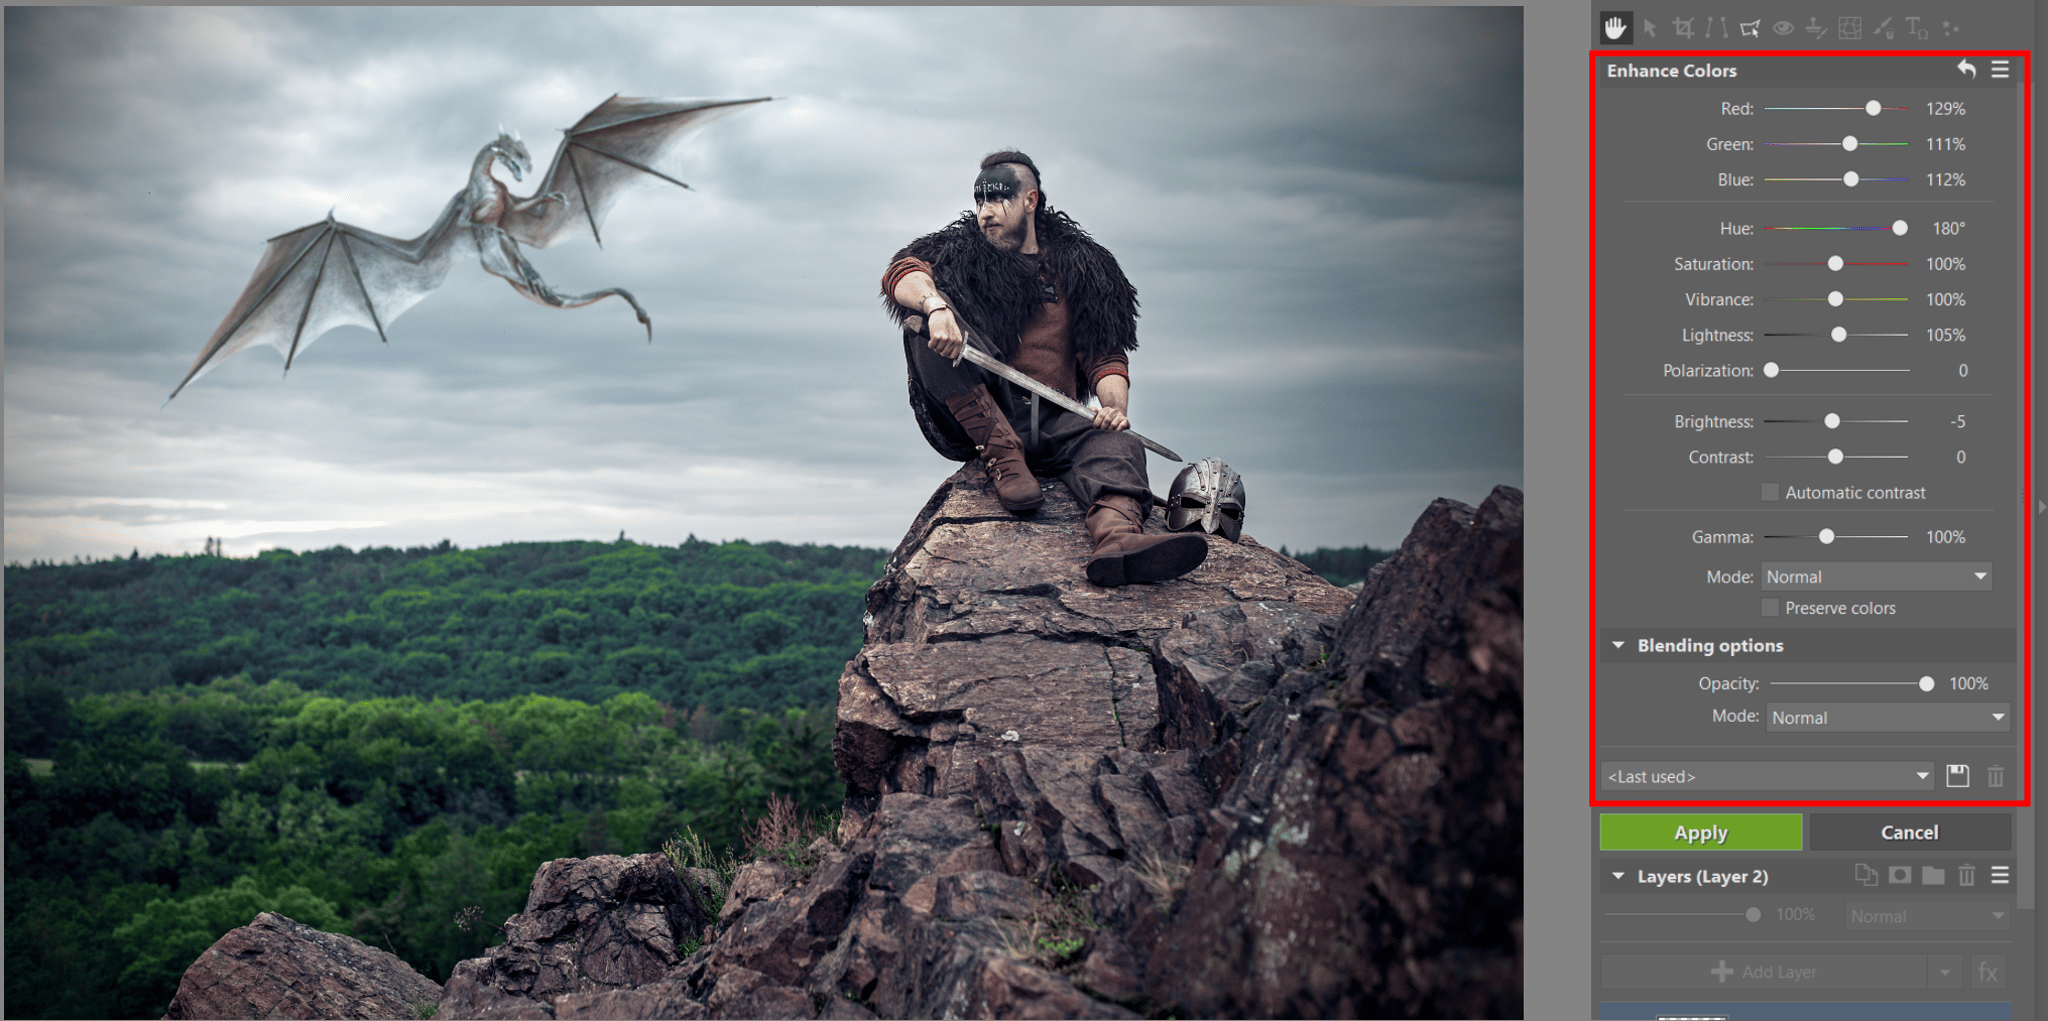
And now for the last step, which is extremely critical – adjust color and exposure. The inserted object must have its color and exposure adjusted in line with the rest of the photograph. As an example, refer to the placement of a cat in the next photograph.
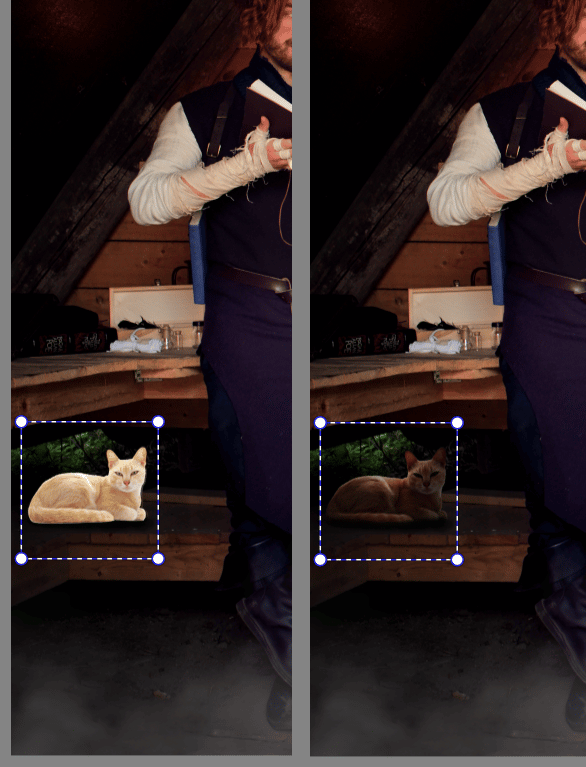
Here, it is obvious that adjustments to color and exposure were essential. For these edits, make use of the Enhance Colors (Ctrl+1) and Enhance Exposure (Ctrl+3) functions. Luckily, we only had to change our dragon slightly. We lightened it up and shifted its colors to shades of blue to match the color of the sky.
Place the object into the photograph
Now that we’ve made it through the basic edits, we can move to adjustments that you’ll use only in certain cases. First, we’ll look at how to place the object into the photo. We often hide the inserted object behind another object, such as a tree or a rock, or we hide it beneath the table. It’s a good idea to at least partially hide the object behind something. It’s another trick that you can use to make the effect more realistic.
Areas where the object touches, stands, or lays on the ground are usually a challenge. Therefore, it’s a good idea to hide these areas in the shadows, behind grass or other objects lying on the ground. The fact that the object touches something in the photograph will add authenticity to the resulting image.
Create a mask
You’ll place the object into the photo by creating a mask. We place the dragon among the clouds. We use a Lasso (L) (or any other selection tool). It’s useful to lower the visibility of the layer with the object so that you can see where the ground leads. This way, you can select it correctly.
We select the clouds behind which we will hide the wings, and we refine the selection. In this case, we increase Radius and Contrast. The clouds are not stable, opaque objects, so the wings should gradually blend into them.
If you are encircling objects that are clearly defined or opaque in this way (in our case, for example, the horizon), you need to make the Radius significantly less, by no more than two or three points. Now, you must be extremely precise and carefully select the object. For this purpose, the Polygonal Lasso (N) may be useful.
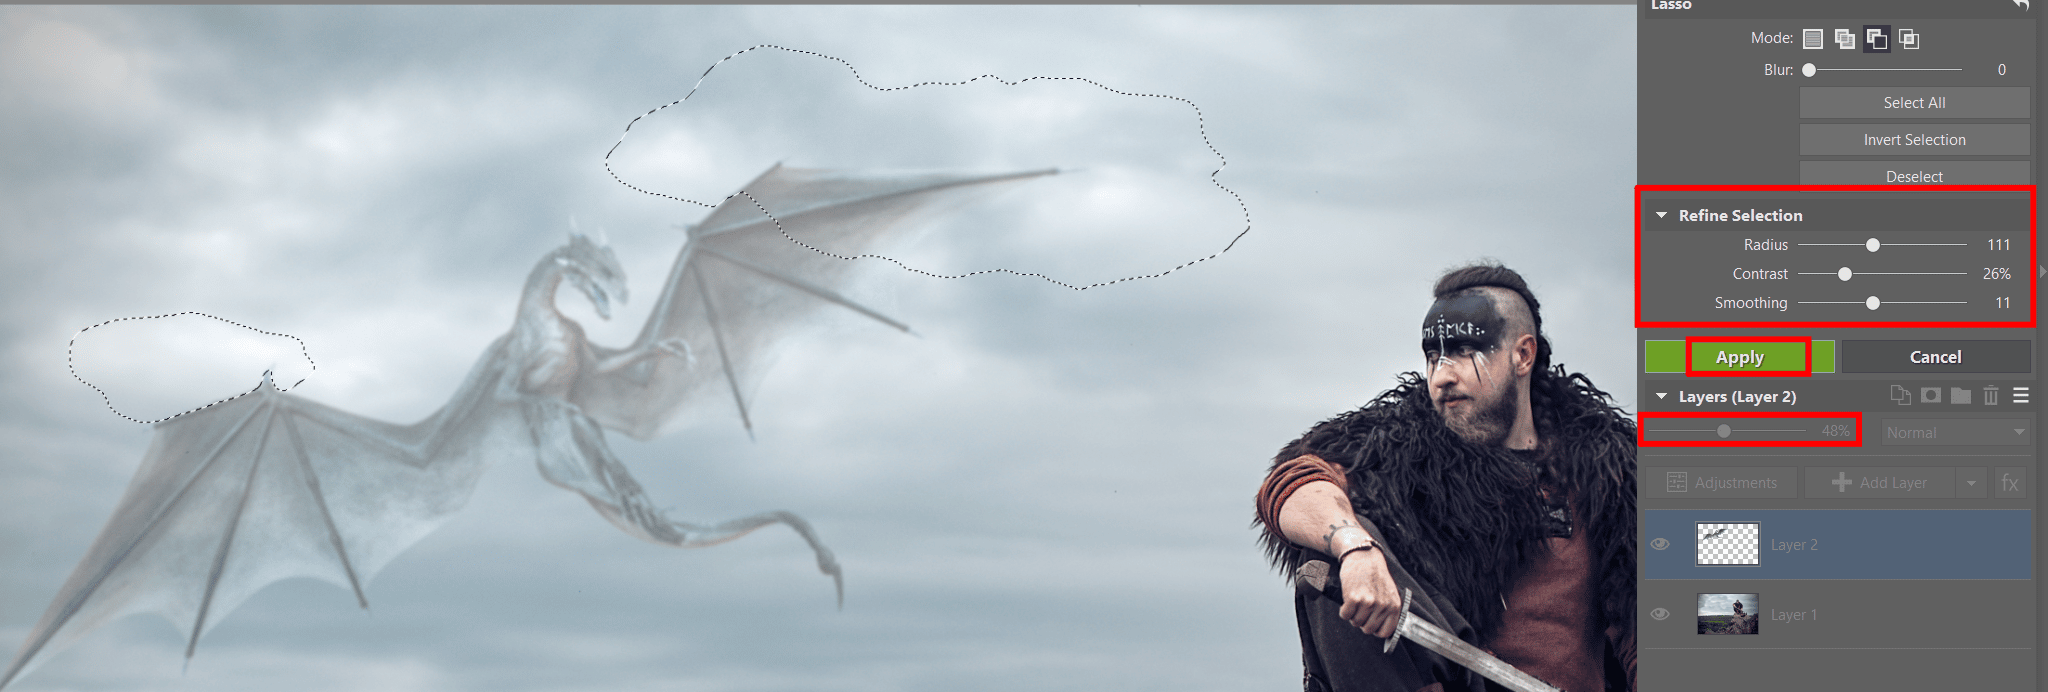
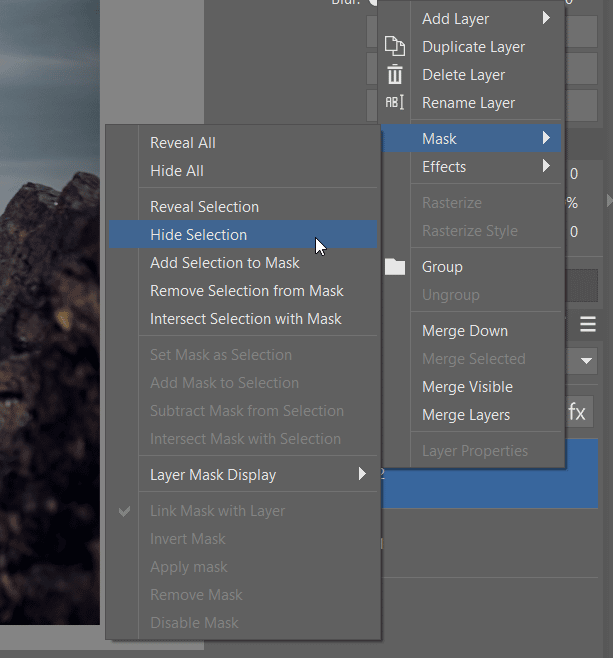
After selection, make your layer visible and create a mask. Simply right click the layer that contains the object and in the section Mask select Reveal or Hide Selection. Your choice will depend on whether you selected an area around or inside, where the object is to blend in.
And our dragon is finished!
Don’t be afraid
Photo manipulation is generally a complex process and with it comes a lot of trial and error. But don’t let this scare you away. You can learn anything when you try and then learn from your mistakes. Adding objects to photos will never be 100% realistic and there’s always someone who will notice the changes made to the photo, but this shouldn’t matter as long as you’re happy with the result.
What’s more, it’s fun! With this type of experimentation, you can let yourself be carried to a world of fantasy and try your hand at magic like from Harry Potter. You can use lanterns or candles to create an atmosphere with warm lights or add a cuteness factor by adding different animals. It’s whatever you want and thanks to Zoner Studio, your imagination knows no limits.
There are no comments yet.