Get Control Over Your Photos’ Colors With the Levels Adjustment Tool
The article is over 5 years old. The information in it may be outdated.
![]()
We are working on its update. In the meantime, you can read some more recent articles.
Our digital age makes everything a whole lot easier than it used to be. Every typo can be corrected, and every photo can be retouched, darkened, brightened, or otherwise fine-tuned to perfection. Well… usually. Levels, meanwhile, are an important, yet often forgotten tool that can rescue more photos than you’d think. So you should learn to work with them well.
I remember how my sister once spent hours developing photos from a dog training grounds in a darkened bathroom, and when I accidentally opened the door to wash my hands, it was a crisis. Photos ruined, my sister on the edge of insanity, and me on the edge of being murdered.
But that’s all far in the past. Today’s digital technologies can save us a lot of frayed nerves. Nowadays, with a little effort, you can rescue a mediocre photo.
Histogram curves—which we won’t cover here—are one tool that can really work wonders with a photo. Histogram levels are another. They’re like curves, but they’re simpler, and they get a lot of jobs done faster.
Reach the Next Level with Levels
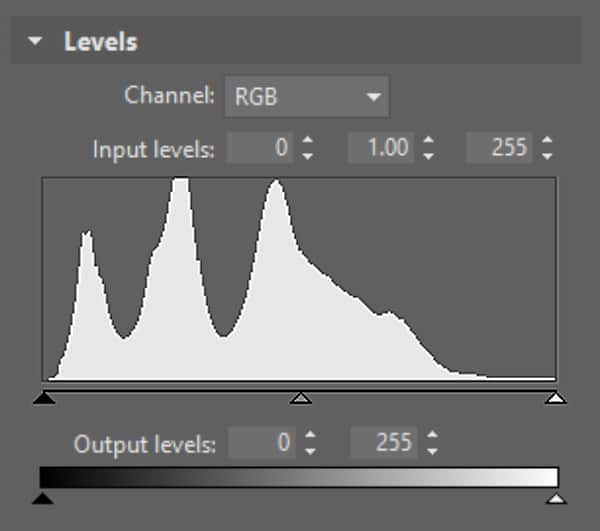
Put simply, the Levels filter lets you give a photo a broader or narrower color spectrum and adjust its midtones, all using a few sliders.
Using the Levels filter, you can enrich the tones in a photo—from its chewy blacks all the way out to its bright whites—and repair a photo that’s tinted blue or pink. Levels works fine even on photos that aren’t exactly RAW quality. It also lets you easily and intuitively adjust other parameters like contrast, brightness, etc.
So let’s take a look together at how to work with Levels tool in Zoner Studio. Levels are available through a button in the Editor’s Toolbox, or the Shift+L shortcut.
Automatically or Manually?
There are two basic ways to work with Levels. Which one to choose depends on how much you want to work with this tool and whether you’re more interested in quick work or in a perfectly balanced photograph.
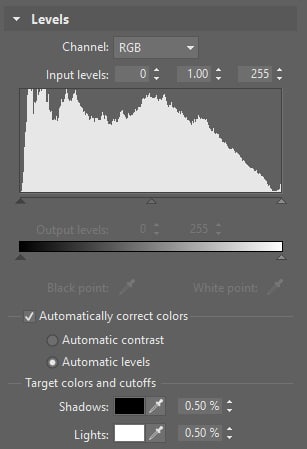
For the easier, faster route, Zoner Studio offers an automatic setting here, where you just set whether you want to automatically adjust contrast, or the levels themselves, and then the values at which black and white should lie.
The other route is adjusting histogram levels in a photo manually.
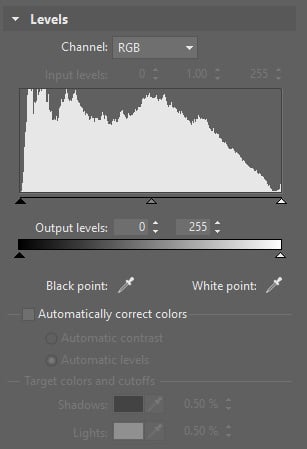
For me personally, manual work with levels is much more attractive. You see, I like to watch the way a photo changes when individual parameters are changed, because that gives me more control over the final photo. It’s like the difference between manual shooting vs. automatic. So below I’d like to show you how to work with levels manually.
The Histogram Is the Foundation
Your main assistant in photo editing is what’s called the histogram.
>> A histogram shows the distribution of brightnesses in a photo, or in its individual color channels. Learn more in our article on reading a histogram.
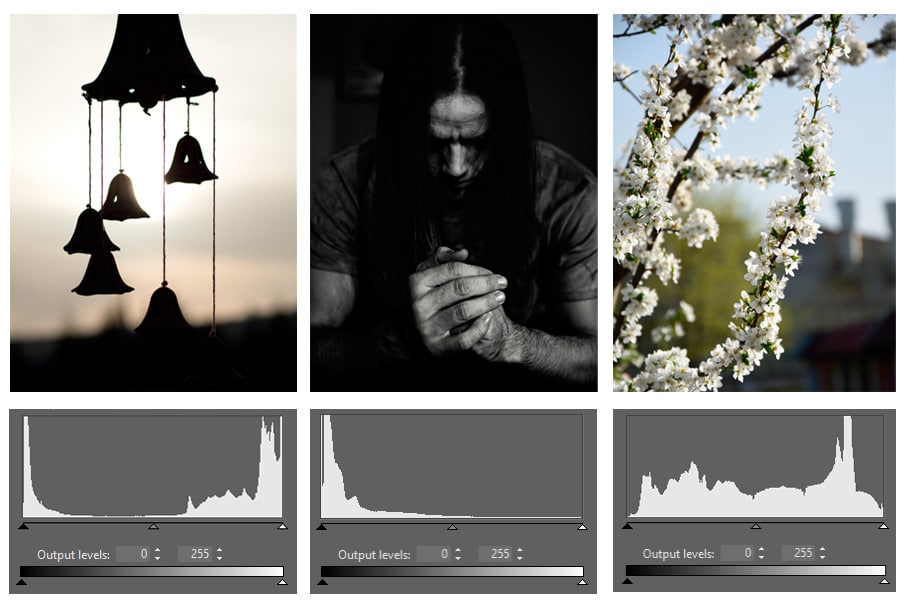
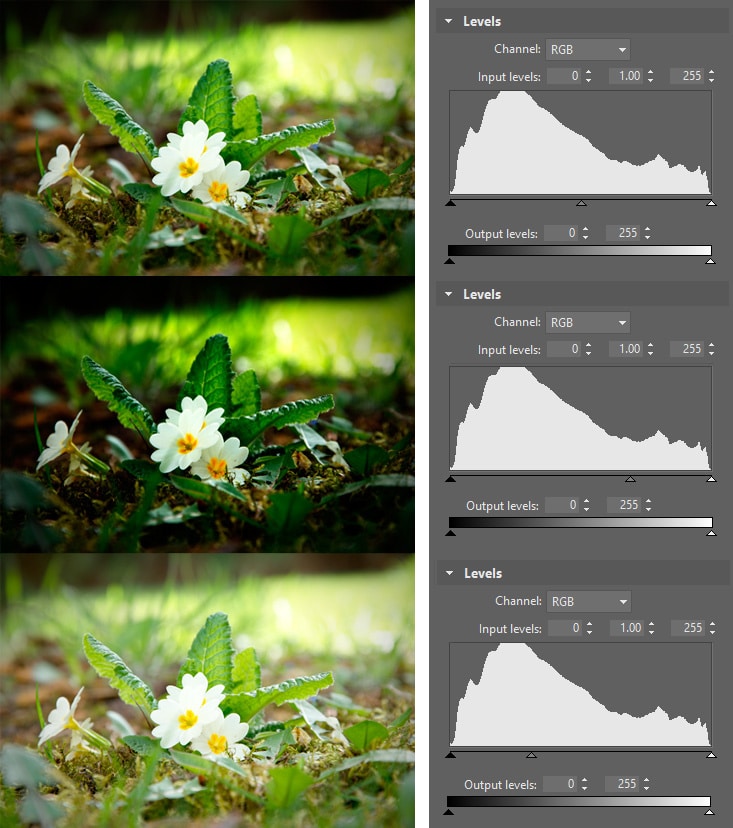
There is no universal rule on how this graph should look. A photo’s histogram doesn’t even have to cover the full spectrum, and the photo can still have everything it needs.
In the illustration below you can see the wildly different histograms for a few select photos. In the middle photo (the portrait) it’s actually not even desirable for the graph to reach all the way out to white, since that would make some of the details too bright and would destroy its atmosphere.
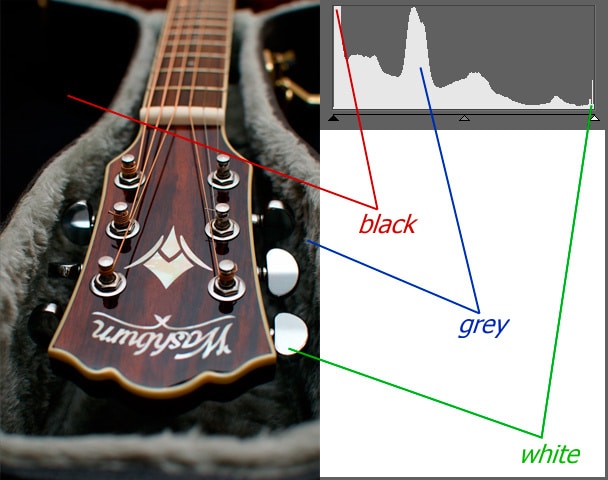
The histogram is the most important thing you’ll need most when working in Levels. Dark tones are represented in the left part of the histogram, while light tones are represented on the right. The height of each column in a histogram expresses the amount of a given shade in the picture. If a picture’s histogram reaches all the way out to the left or right edge, then the picture contains completely black or white pixels—a phenomenon called “blowout”.
Nikon D5500, Nikkor AF-S DX 35/1.8G, 1/125 s, f/5.6, ISO 100, focal length 35 mm
Blown-out areas contain no detail or color, so you should usually try to prevent them. This is actually not such a problem for hitting true black; in fact, it can give a photograph an interesting atmosphere. But for white, it’s a problem. Large white areas with no detail are unpleasant to look at and do nothing for the beauty of a photo. So try to avoid causing blowout when editing your photographs.
Adjust a Photo’s Color Spectrum
You can mentally divide the Levels filter into four basic parts—Channel, Input Levels, Output Levels, and the Black Point/White Point controls. Let’s take a closer look at each of these.
Work With Colors via the Channel Control
The Channel box shows and sets whether you’ll be working with the overall RGB channel, or with the channels for individual colors. You have these variants to choose from:
- RGB—editing the whole color spectrum
- Red—editing the tones in the red spectrum
- Green—editing the tones in the green spectrum
- Blue—editing the tones in the blue spectrum
I recommend trying out the sliders in all four channels. That will give you a clear idea of what purpose each channel serves. While the RGB channel, for example, is mainly useful for fine-tuning blacks, whites, and shadows in a photo, the individual color channels will help you to remove e.g. blue tinting.
Use Input Levels to Adjust Lights and Shadows
The input-level values numerically express the positions of the three small arrows under the histogram that control the whole light spectrum from black to white.
- The black arrow adjusts dark tones.
- The gray arrow adjusts midtones.
- The white arrow adjust light tones.
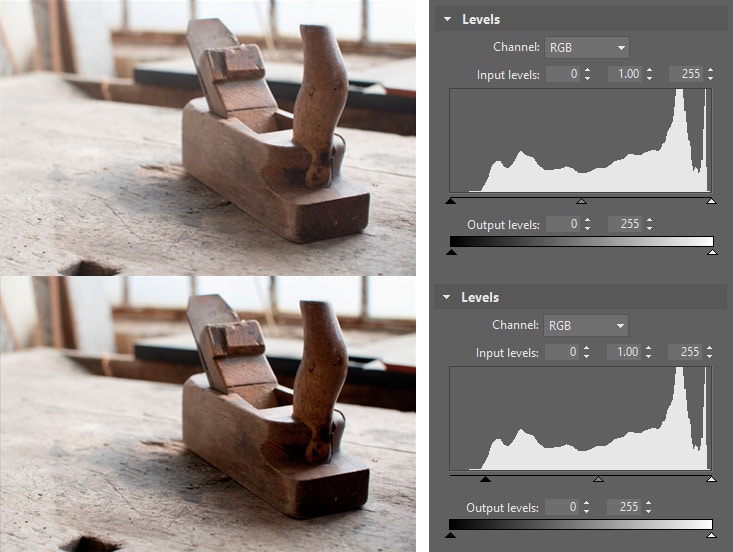
Adjust dark tones using the dark arrow. Use this arrow to, for example, easily get true blacks, or soften the photograph overall by changing the black areas to dark gray.
You can use this arrow to adjust e.g. a photo that “happened” because you were shooting at a party using a flash, and a strobe light or other sharp light got into the shot. Photos like these are washed-out and too light. This can all be fixed by filling dark tones and blacks back into the picture, by moving the left arrow leftwards to the edge of the histogram. This gives the photo a greater tonal range.
I applied that principle to this picture here, and this washed-out photo suddenly came to life. A greater range gives a photo a more powerful look.
Nikon D5500, Nikkor AF-S DX 35/1.8G, 0,8 s, f/8.0, ISO 100, focal length 35 mm
What if your photo reaches all the way from pure black to pure white, but that still doesn’t do the trick? Then move the gray arrow around to adjust midtones without having to worry about blowout. This slider doesn’t move the boundaries of white or black at all—just the middle.
The midtones slider helps you fix a photo’s overall brightness without changing its black and white points.
The third and last slider is the white arrow. This one can be decisive for making your white snow really look white, or helping your sister’s white dress keep its texture. The closer the arrow is to the right edge, the whiter the photo’s light tones are. But adjusting light tones has its place in product photography as well, as you can see here:
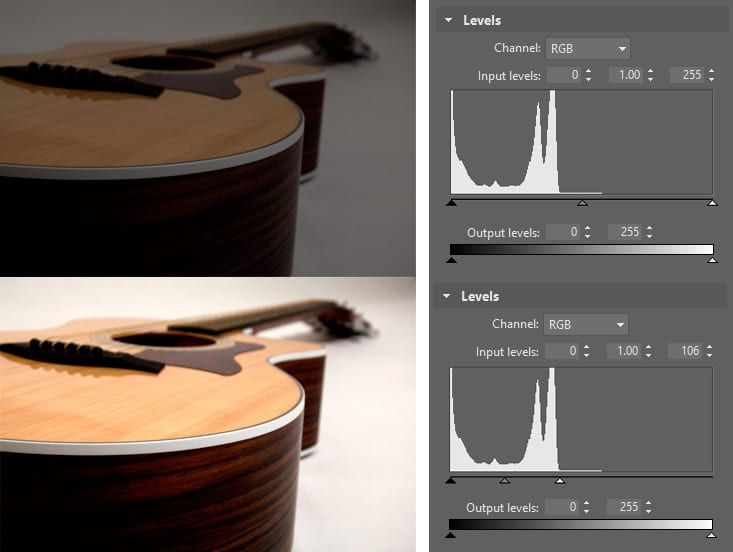
With a well-chosen upper boundary for whites, you can get quite good results out of even very dark shots.
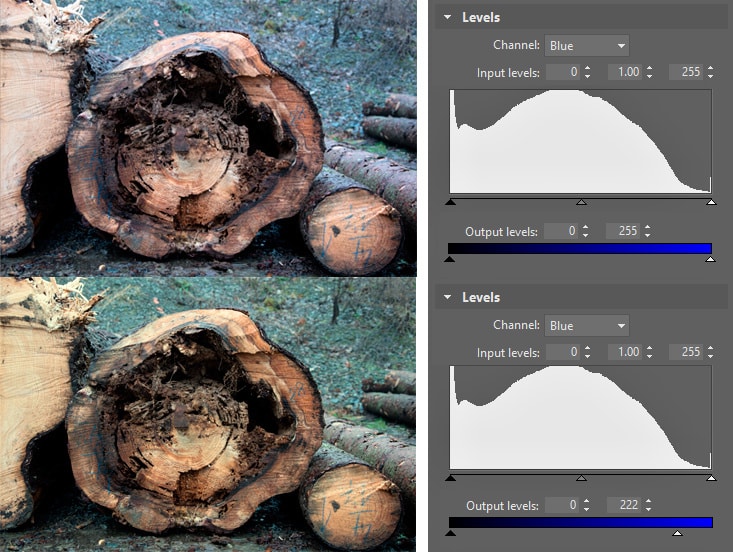
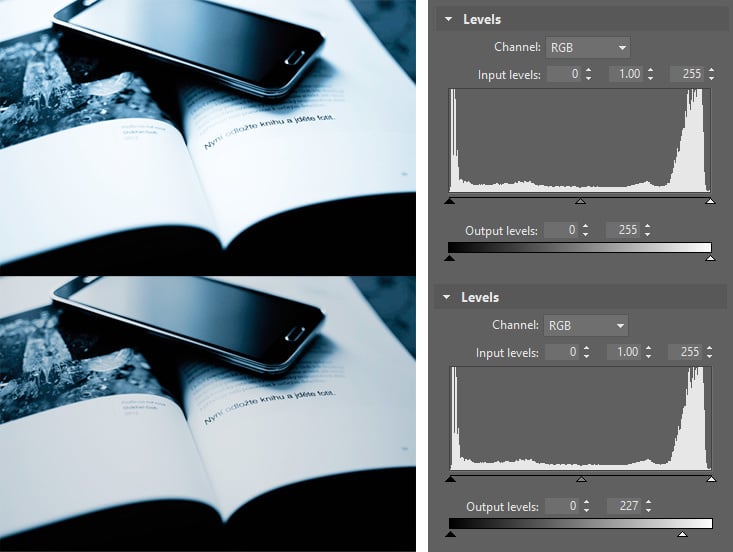
Suppress Unwanted Colors With Output Levels
The Levels controls can affect not only the brightnesses in a photo, but also its tinting. For this, use the individual color channels in combination with Output Levels.
Here you’ll be subtracting colors rather than adding them. And you’ll be subtracting precisely the color that bothers you the most in a picture.
In this picture, I used Levels to remove the blueness caused by a thin mist.
Nikon D5500, Nikkor 18-105/3.5-5.6G Ed Vr, 1/15 s, f/6.3, ISO 640, focal length 34 mm
In this photo, meanwhile, I used Levels to eliminate redness:
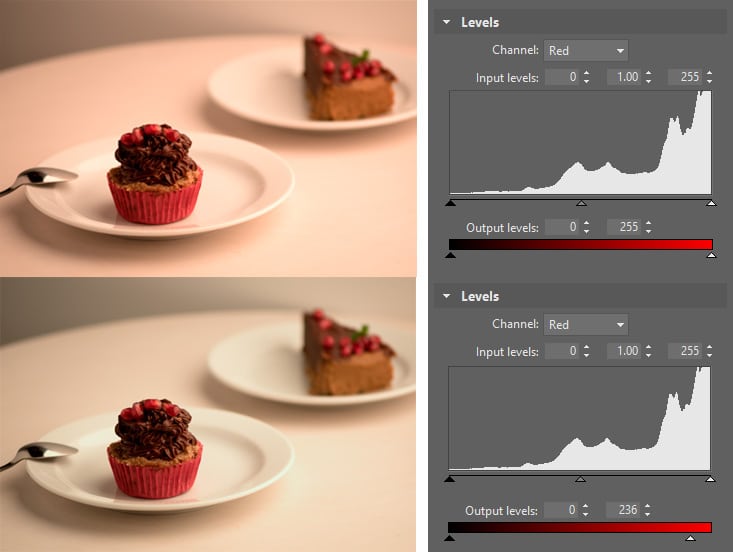
Nikon D5500, Nikkor 18-105/3.5-5.6G Ed Vr, 1/125 s, f/3.0, ISO 100, focal length 105 mm
But Output Levels aren’t just for tinting. You can also use them with the RGB channel to reduce excessive contrast, as in the next example. Because the white area takes up too much of this picture, it can be a bit hard on the eyes. In a case like this it can be a good idea to keep the histogram from reaching all the way out to pure white.
Nikon D5500, Nikkor AF-S DX 35/1.8G, 1/40 s, f/1.8, ISO 320, focal length 105 mm
Black Point, White Point
Now all that’s left to look at are the two eyedroppers—the Black Point and the White Point. Their function is simple. Click an eyedropper and then on the picture to set which color in the picture represents the photo’s darkest or lightest spot. If you click a dark spot with the white eyedropper, the whole picture will burn bright white, and vice versa. But normally your goal here is just to get natural-looking dark or light tones. Frankly the best way to understand these two are to try them out live.
Levels Aren’t Beneath My Level
There are other tools for doing some things that Levels does—e.g. exposure adjustments, white balance, and the like—but once you learn to work with this tool, you’ll be coming back to it again and again, because it offers so much all in one package.
Some photographers may use the histogram to check blowout, but believe me, there’s nothing better than to learn to work with this tool and form your own opinion on it. First you have to learn to work with a tool at all before you can work with it efficiently. After all, the key thing in photography is originality. And it all starts with educating yourself.
Do you need to fine-tune the lights and shadows in your photos? Or maybe adjust their color spectrums? Download Zoner Studio, use it free for 7 days, and work some wonders.
Terry Byford
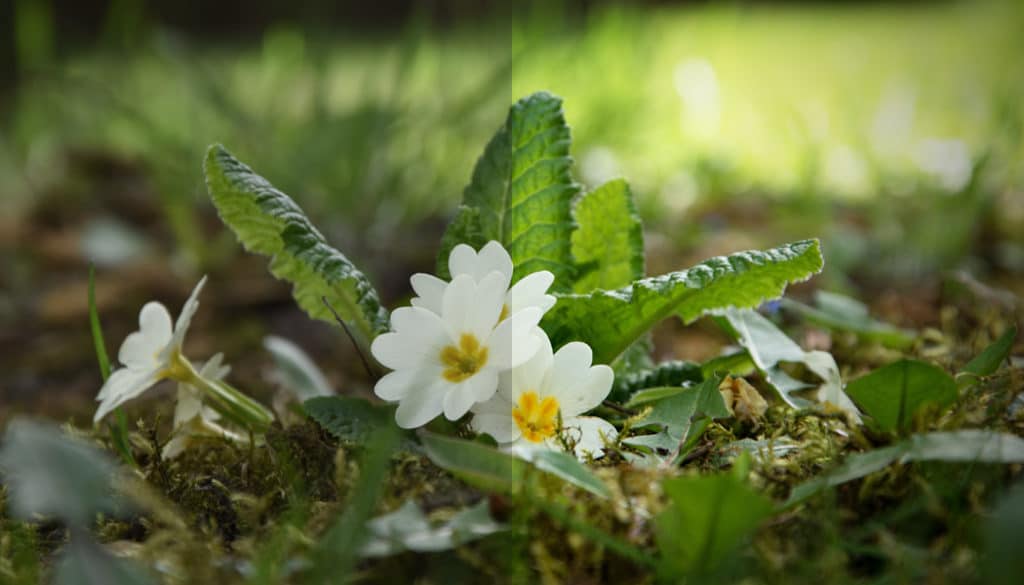
An excellent article for those who have wondered what these controls do. Sometimes I like to work “back to front” and go straight for the black eyedropper, especially with close up and near field images of flowers and particularly where the backdrop is a bush embracing the full frame. The backdrop must cover the whole image, as otherwise the technique does not work that well. Basically, it means working with a completely green background with varying levels of shadow to play with.
By experimenting with the eyedropper placement in the various shadow areas it is often possible to significantly enhance the contrast between the subject and its background. This is not the same effect as using the contrast enhancer function as this will impact on the bloom itself, and other highlights, not an effect that I want.
Depending upon the shadow area selected, the effect can be quite dramatic, and with red/orange/yellow blooms working particularly well with this treatment.
Frank Graham
Yes very excellent examples of using those sliders. Believe me I like Zoner but have passed on the sliders just due to speedy mentality upon trying them. Now I know their value and usage. Manual & site just didn’t do it for me. But seeing examples in action works. That one using both grey & white on guitar is real grabber as is the wood shop shaver going darker. More such fine articles please.
Zoner
Thanks, Frank, we’ll try to do more photo-editing articles. It makes us happy that you like it! :)
Mike Baker
I enjoyed the article, thank you for clarifying these tools, I noted in the images used as examples the histograms appeared to be identical, I was looking for the subtle variations that reflected the changes described?
Zoner
Thank you, Mike, for your comment. The histograms shown are only simplified histograms in the tool itself and they show the original diagram. If you open the Levels tool, you can see the changing histogram of the picture above the tool settings: http://prntscr.com/cep9c6