Photographing the Northern Lights: Fortune Favors the Prepared
The Northern Lights are back for the winter again, and many of us photographers will be heading up to greet them with our cameras. They’re a breathtaking experience, and they’re often even more gorgeous in pictures than in reality. It’s time to head north to polar lands and use the season to the fullest! Read on to find out where to seek the Northern Lights and how to capture them.
For our European readers, the easiest place, and in some sense the surest place, is the northern part of the continent—Norway (including the Svalbard archipelago), Sweden, Finland, or the very popular choice of Iceland. Northern Scotland sometimes also gets a mention. As for readers elsewhere, we won’t be giving out unfounded advice here, but suggestions are welcome in the comments! In general, the higher the latitudes, the greater the chance of seeing the Aurora Borealis. The most appropriate time for observing them is from October to March.
Finding the Right Site
Getting close to the polar circle is one foundation for success. Visiting a good site with no light pollution is another. Even though I do love Iceland, I actually much more frequently travel to the area between Jukkasjärvi in Sweden and Narvik and Tromsø in Norway. This triangle also contains the renowned Abisko national park, which even has a Northern Lights observation station. The unusual lake named Abiskojaure is situated there as well. It is unusual in that clouds never form above it, making it an ideal place for Northern Lights photos. But I also have to mention the Lofoten islands. They offer lovely scenery, although they sadly suffer from unstable weather, mainly in December and January. By February the weather is kinder, and it remains so in March.

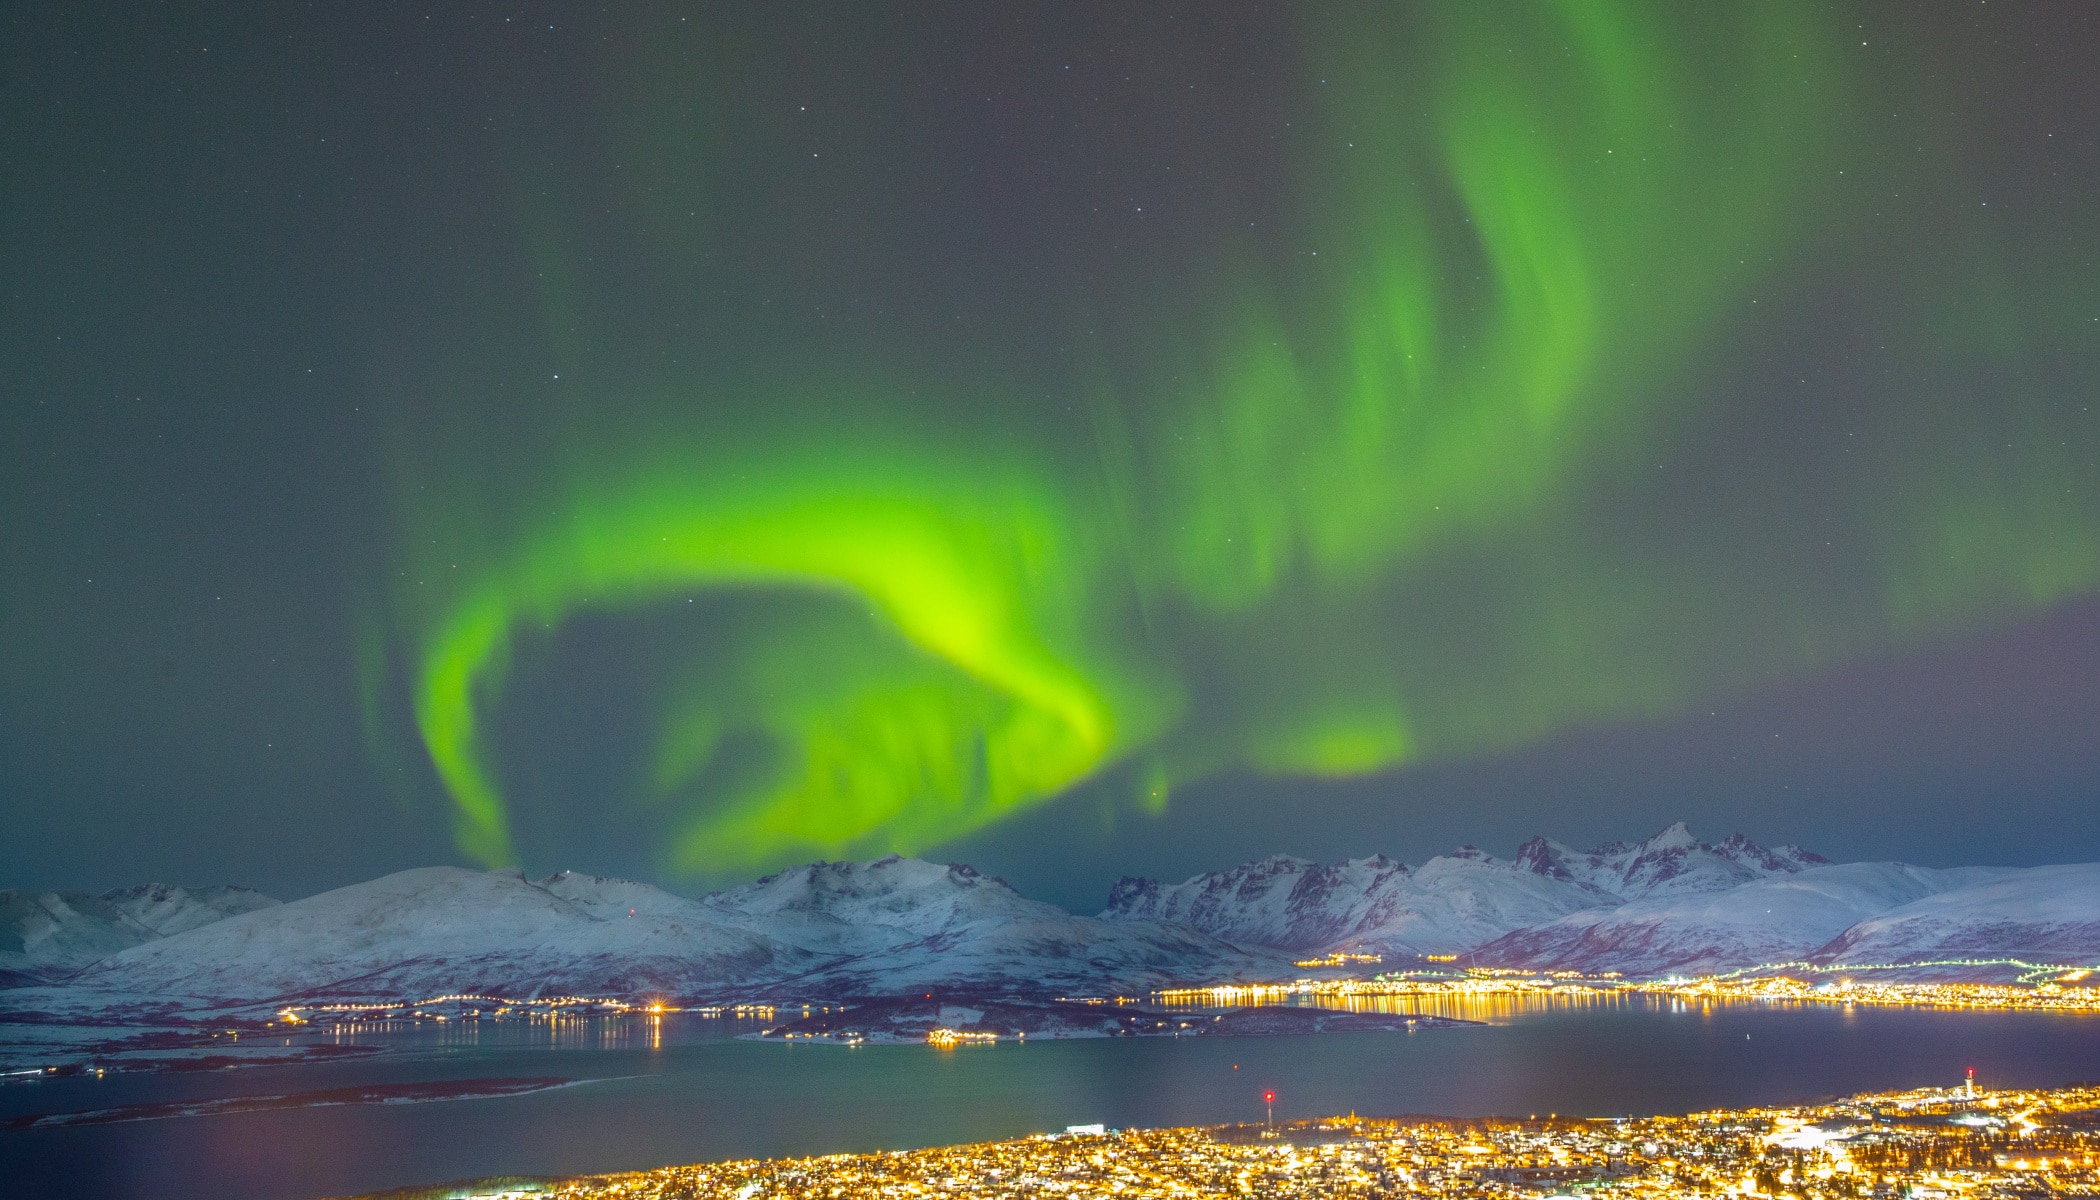
I personally have had the most success nearby Tromsø, and even—surprisingly—right in its downtown, which contains several observation points with good reputations. Like Floyfjellet, a big peak that can be reached via several footpaths and a cable car as well. The city itself has a very pleasant atmosphere, and it offers a number of other options to suit traveling photographers of varying tastes. From walks through the polar landscape to remarkable modern architecture to whale-sighting expeditions.
Meanwhile, a number of local agencies offer nighttime trips to see the Aurora Borealis—borderline photo-safaris—but I prefer moving around independently and a certain calm. There are a number of apps today with forecasts for its intensity, its likelihood and sometimes even its location. These will definitely help you with finding your bearings and “your” lights. Aurora Forecast and Aurora Alerts are two of the most popular.

How to Gear up for the Northern Lights
You can find the Lights either on the horizon or right overhead. This phenomenon changes over time, gets stronger and weaker, fades and returns in pleats of colorful veils and sometimes even flashes of light. It most frequently comes in tones of green and purple, but sometimes the skies resonate with such a show of colors that it’s not the cold that’s making you gasp. These sky events come and go very quickly, and so fortune really does favor the prepared.

A firm and stable tripod is a must for photographing the Northern Lights, because there are often winds that could send a lighter tripod shaking. I use manual focus 95% of the time, because autofocus tends to struggle in the dark. It’s good to “latch onto” an object or a bright point, or experiment with focusing at infinity.
It also pays to know your camera’s possibilities, and especially what ISOs it can manage. Logically that will affect what settings you use. I generally use ISOs of 800–3200, an aperture of around f/5.6, and an exposure based on the lights’ intensity. From about 1/4 second to 15 seconds. Due to the Earth’s motion, any longer exposure will turn the stars into streaks, which is usually something to avoid.
Watch Your Exposures and Your Lenses. And Dress Warm!
I recommend using a long exposure time. When you’re photographing a faint and inconspicuous glow in the distance, an exposure time of 10 seconds can make for a great picture. But I’ve also experienced a glow by a fjord that was so strong I practically didn’t need a tripod, because it was practically daylight. Here as well it can be very nice to use a long exposure along with a lower ISO.
The choice of what lens to use is up to your preferences as a photographer. But in general the wider angles work best. No advice is universal, and if you want to capture the Northern Lights shining over specific objects, you’ll be focusing on those objects. The same goes for photographing them shining over people—a popular choice today. You can illuminate those people with a flashlight for example for a nice effect. Getting these pictures right is much easier with a remote trigger, as well as when you’re saving to the RAW format.
During any trip up north, it’s essential to take good clothing along as well, because good shoes and warm clothing are a must when you’re spending several hours outdoors. Once you’ve caught a chill up there in the North, it won’t be leaving you easily. Your camera will be getting cold too, and that’s why it’s important to pack extra batteries—these drain much faster in the winter than you’re used to normally.

A trip up to see the Northern Lights is a huge experience, and remember, no matter how much you prepare, it’s essential—as it is with so many photo-trips—to be lucky. But we’re sure that luck will be on your side and that you’ll take lots of great pictures too!
There are no comments yet.