How to Photograph Snowflakes
Winter’s a season when most photographers put away their macro lenses until spring. But in reality this cold period offers much more than it might seem. Thanks to the freezing temperatures, you can photograph things like glaze ice… but snowflakes are a much bigger challenge.
Convinced it’s not possible to photograph a snowflake with the gear you own? You can do macro even with just a good compact.
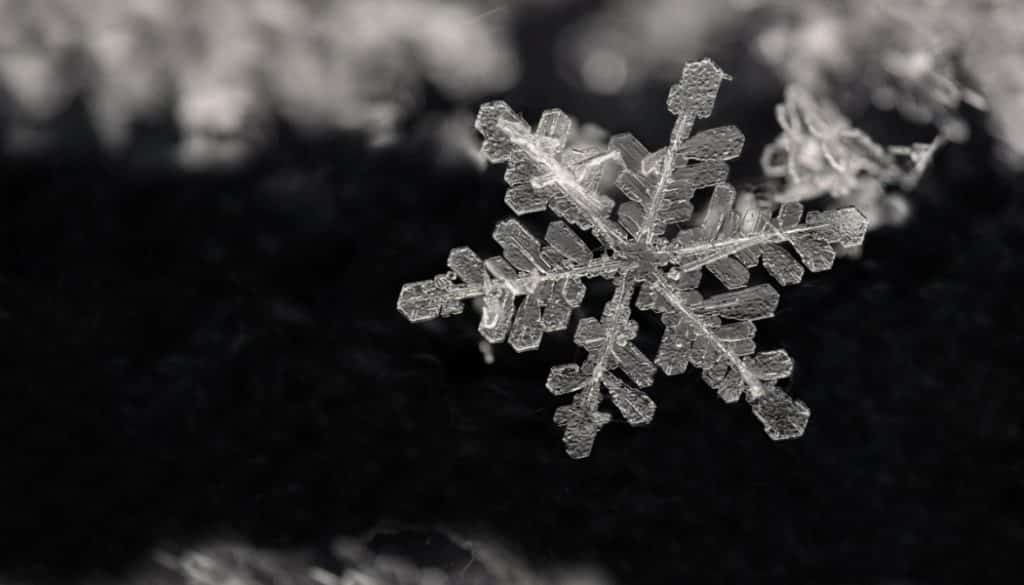
The first photograph of a snowflake was taken by Wilson Bentley in 1885, using a bellows camera attached to a compound microscope. His equipment was primitive, so today any macro-capable compact or any DSLR with a macro lens will serve you sufficiently.

Wait for the Right Weather
But don’t run straight out into the cold; it’s not that simple. Not all snow is equal. To photograph snowflakes, ideally you need to be shooting right when it’s snowing, or when it’s just snowed. When photographing two-day-old snow, you’d be hard-pressed to find a snowflake. There’s likewise no point in seeking snowflakes during a wet, heavy snow.
The flakes’ shape is influenced by the air temperature. From -2 to -14 °C (7 to 28 °F) you can discover various types of snowflakes with various shapes and sizes. In general lower temperatures mean larger snowflakes.

What Gear Should You Take?
The most important things to take are truly warm clothing and a thermos with coffee or tea to warm you up, because like it or not, it will take a while before you get a decent picture. Ideally head out when it is about -2 °C (28 °F), right during or after a snowfall.
You’ll need these accessories:
- a fine paintbrush for transferring the flakes
- black cloth or a black board
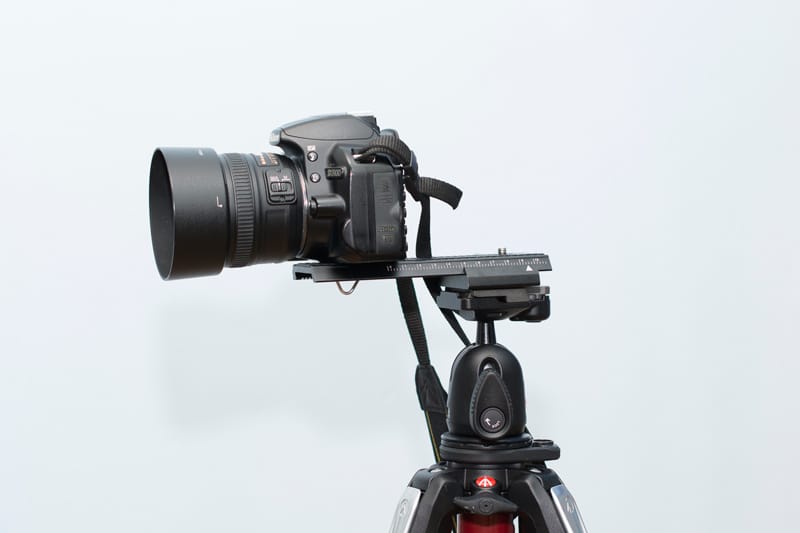
- a DSLR or compact with macro mode
- a softbox
- a lamp
Other accessories that, while not needed, are useful:
- extension tubes
- macro conversion lenses (I use a Raynox DCR-250)
- a tripod
- an external flash
How to Take the Pictures
Check the weather before heading out. You can check a snowflake by eye, or magnify it to 100% on your camera. So when you see that beautifully formed snowflakes are falling and not just snow crystals, it’s the right time to ready your gear.
You’ll want to use a black glove as your foundation for photographing snowflakes. While it’s not a completely ideal background due to the large number of fibers, it’s enough for some first efforts. If you fall in love with photographing snowflakes, you can get yourself a black matte board or a piece of chemise to serve as an attractive background.
If you use a glove, you’ll want to leave it out thrown into the snow for a bit, to cool it down so that snowflakes won’t melt on it. Once snowflakes catch on it, use the brush to turn them onto the side that you like better. But you can also photograph snowflakes clumped together.

Once you find “your” snowflake, carry the snowflake and its background under a tree or roof, or cover it with an umbrella or the jacket from a photographer’s backpack. You’ll be using multiple shots, and a second flake landing in the middle of them will ruin every previous photo in your shoot.
Watch the Sharpness
When shooting with a DSLR, you can use a macro lens, or attach a fixed lens backwards, or use extension tubes. Personally I use a macro lens with a Raynox DCR – 250 macro conversion lens. When taking the shots, I choose an aperture where there won’t be diffraction, so on my Tamron 90 mm lens I choose apertures in the f/8–16 range in combination with the macro conversion lens. On my old 40mm Nikon lens, I generally never used an f-stop higher than f/8.
So I recommend that you find the f-stops on your camera where you have the sharpest detail. It’s not always smart to set the highest possible f-stop. Sometimes less is truly more.
How to Shoot Your Source Pictures
Since snowflakes are small and sometimes hard to find, it’s good to shine a pocket light to find them more easily. As soon as you find a snowflake, turn off the light. Or, if you have trouble focusing without the extra light, go ahead and leave the lamp on.
Set a fixed zoom like 1:1 on the macro lens. Use only physical distance from the snowflake to control the focus. Use this approach to photograph it in its full depth. If you don’t have fine manual sharpness control, use a macro rail; it will make your work easier in many ways. For ideal lighting of the snowflake, try a diffuser. For each final picture you’ll need 5 to 20 shots.
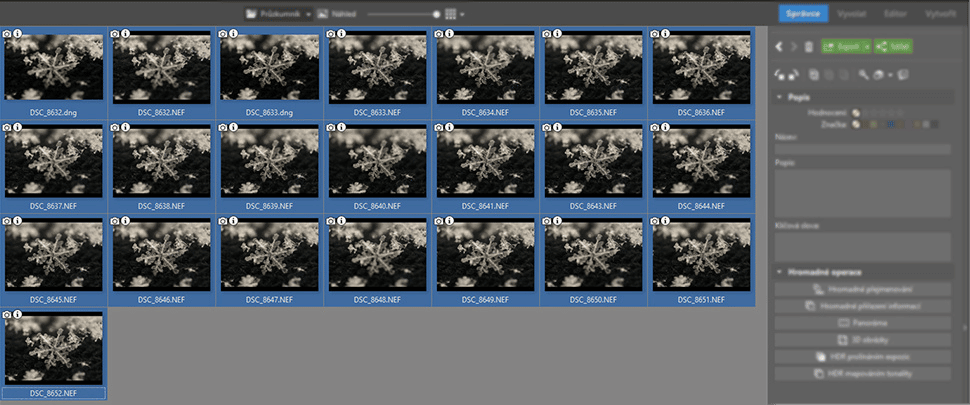
Edit all of your source shots identically and then join them using focus stacking, or in specialized software made specifically for this kind of joining. Then fine-tune the resulting picture in Zoner Studio, and everything’s ready.

What Can Go Wrong
It looks easy, but there are a lot of things that can go wrong while taking the pictures. Your own breath can be a big problem. You’re breathing out close to the photographed snowflake, and so it can easily melt. It took me a long time to learn not to breathe so deeply.
As I mentioned above, many times I’ve had another snowflake fall on the one I was photographing, making my last 12 shots worthless. That’s why I recommend a covering for the photographed snowflake.
The biggest problem is in making sure the source pictures all tie in to each other precisely. When shooting by hand, I recommend that you e.g. maintain one focus point constantly in the middle of the snowflake, or on a notable point on the photographed background. If you move your camera a little to the side, it’s nothing horrible or unsalvageable. But if you change your camera angle during the shots, you’ll never get the shots to lay right atop each other. That’s why it’s good to use a macro rail at first; it will save you from this problem.
Here’s wishing you many photographic successes. Make sure to watch your health, and don’t freeze yourself—frozen fingers are nothing nice. Then show off your pictures on Zonerama!
And a small tip in closing: snowflakes are beautiful, but snow crystals can be enchanting too.
There are no comments yet.